
On this page
- 1.0 Purpose
- 2.0 Authorities
- 3.0 Reference documents
- 4.0 Definitions
- 5.0 Acronyms
- 6.0 Operational guideline
- 7.0 Appendix
- Appendix 1: Aseptic sample collection
- Appendix 2: Core drilling for food samples
- Appendix 3: Environmental sample collection
- Appendix 4: Random sample collection
- Appendix 5: Water and ice sample collection
- Appendix 6: Types of analyses for food samples
- Appendix 7: Canadian Shellfish Sanitation Program (CSSP) sample collection
- Appendix 8: Dairy products sample collection
- Appendix 9: Fish and seafood sample collection
- Appendix 10: Fresh fruit and vegetable sample collection
- Appendix 11: Honey sample collection
- Appendix 12: Maple sample collection
- Appendix 13: Meat and poultry products sample collection
- Appendix 14: Processed egg product sample collection
- Appendix 15: Processed fruit and vegetable products sample collection
- Appendix 16: Shell egg sample collection
- Appendix 17: CFIA payment for food sample collection
1.0 Purpose
The purpose of this document is to provide guidance to Canadian Food Inspection Agency (CFIA) inspection staff on the general guidelines for food sample collection.
Sample collection is a task conducted under the Standard Inspection Process (SIP) and used to assess compliance of a food with relevant legislation and to gather baseline information on food products. This guidance supports inspectors to take samples that are representative of the food and the food production environment and applies to samples taken to support planned, official and as required food sample collection activities.
This guidance is written with the assumption that inspection staff have reviewed the Food inspection guidance: sample collection page (accessible only on the Government of Canada network) and have been properly trained in sample collection techniques.
This document is intended to be used in conjunction with other guidance documents as referenced in Section 3.0.
2.0 Authorities
- Food and Drugs Act (FDA)
- Food and Drug Regulations (FDR)
- Health of Animals Act (HAA)
- Health of Animals Regulations (HAR)
- Safe Food for Canadians Act (SFCA)
- Safe Food for Canadians Regulations (SFCR)
The inspection powers, control actions and enforcement actions authorized by the above legislation are identified and explained in the Operational guideline – Food regulatory response guidelines.
3.0 Reference documents
Common inspection references
- Standard Inspection Process (SIP)
- Standard Regulatory Response Process (SRRP)
- DSDP Standard Operating Procedures (SOPs) (accessible only on the Government of Canada network)
- DSDP Inspection Case Management Guidance (accessible only on the Government of Canada network– RDIMS 14671957)
- LSTS User Services User Guide (accessible only on the Government of Canada network – RDIMS 3495373)
- Operational procedure: Calibration procedures for common equipment used by the CFIA inspectorate
- Use of digital recording (Camera, Video, Audio) devices during inspections
Food inspection references
- Biosecurity for inspection activities (accessible only on the Government of Canada network – RDIMS 7500000)
- Business Rules of Use for the IMS (accessible only on the Government of Canada network)
- Canadian Food Inspection Agency – Health Canada Food sampling and testing terminology
- CFIA Sampling Information (accessible only on the Government of Canada network)
- Chemical Residue Violation Report
- Food inspection guidance: sample collection (accessible only on the Government of Canada network)
- Health Canada's Policy on Listeria monocytogenes in ready-to-eat foods (2011)
- Health Canada's Lists of permitted food additives: Lists of permitted preservatives
- Issues Management System User Manual (accessible only on the Government of Canada network – RDIMS 1599661)
- Industry guidance: Control measures for Listeria monocytogenes in ready-to-eat foods
- Operational procedure: Control response plan for the presence of Listeria monocytogenes in ready-to-eat (RTE) food product
- Operational procedure: Control response plan for the detection of Listeria in the ready-to-eat processing environment
- Operational guideline: food regulatory response guidelines
- Operational procedure: Responding to food complaints (accessible only on the Government of Canada network – RDIMS 13899359)
- Operational procedure: As required food sample collection
- Operational procedure: Official food sample collection
- Operational procedure: Planned food sample collection
Commodity specific inspection references
- Basic Guidelines for the Collection of Raw Milk Samples (accessible only on the Government of Canada network – RDIMS 3147092)
- Canadian Shellfish Sanitation Program manual (CSSP)
- Commodity specific guidelines and assessment criteria (SGAC) (accessible only on the Government of Canada network)
- Canadian Grade Compendium Volume 2 – Fresh Fruit and Vegetables
- Food Allergen Elisa methods used by the CFIA (accessible only on the Government of Canada network – RDIMS 12132117)
- Operational guideline: Developing a marine biotoxin monitoring control plan
- Operational guideline: Monitoring for marine biotoxins in Geoduck in British Columbia
- Operational procedure: Implementation of memorandum of understanding with samplers for the delivery of the Canadian Shellfish Sanitation Program
- Operational procedure: control response plan for molluscan shellfish test results exceeding Canadian maximum levels, standard or guidelines
- Operational procedure: Fish grade verification
- Operational procedure: Fresh fruits and vegetables product inspection
- Operational procedure: Honey grade verification
- Operational procedure: Maple syrup grade verification
- Raw Milk Samples: Stability of Chemical Residues (accessible only on the Government of Canada network – RDIMS 3553543)
- Operational procedure: Control response plan for the detection of E.coli in raw beef products
- Industry guidance: Preventive control recommendations on the use of nitrites in the curing of meat products
- Canadian Standards of Identity Volume 7 – Meat products
- Preventive control requirements for biological hazards in meat products / Control measures for Escherichia coli O157:H7/NM in raw beef products
Other CFIA sample collection references
- Environmental Swabbing Kit and Ordering Process (accessible only on the Government of Canada network – RDIMS 3413640)
- Shipping Foods with Dry Ice (accessible only on the Government of Canada network – RDIMS 3219726)
- Inspector Toolkit (accessible only on the Government of Canada network – RDIMS 11289973)
- Receipt for Sample Taken CFIA/ACIA 4168 (accessible only on the Government of Canada network)
4.0 Definitions
Unless specified below, definitions are located in either the:
- Safe Food for Canadians Regulations: Glossary of key terms
- My CFIA glossary of terms
- Canadian Food Inspection Agency – Health Canada Food Sampling and Testing Terminology
- Aseptic
- free of pathological (disease causing) microorganisms.
- Aseptic sampling
- Sampling performed using sterile apparatus and methodologies to prevent microbiological contamination of both the sample and the product being sampled to ensure the sample accurately represents the microbiological conditions at the time of sample collection.
- Aseptic technique
- The methods used to take a clean sample or sample unit without cross contaminating the sample, sample unit or the surrounding areas.
- Composite sample
- A subset of sample units that are combined and mixed to homogeneity.
- Food contact surface (FCS)
- Any surface or object in the post-lethality processing environment that comes in contact with the food product.
- Food grade sanitizer
- Sanitizer that is approved for food contact use, verified to be effective for the intended purpose and is prepared according to supplier specifications.
- Lot
- A quantity of product that for any reason is considered separately from any other quantity of product for the purpose of an inspection.
- Lot size
- The lot size is the number of units of product in a lot.
- Random sample
- A random sample is one in which all elements in the lot have an equal and independent chance of being included in the sample.
- Representative sample
- A sample subset used when population sizes are too large for the test to include all possible members or observations. A representative sample contains the characteristics of a larger population which represents the population as a whole and does not reflect any bias towards a specific attribute.
- Sample
-
A sample is a collection of one or more sample units selected from a lot (food product) or environment for inspection. The sample comprises all of the sample units drawn for examination or testing purposes from a particular lot.
- Analytical unit: The amount of product withdrawn from each of the sample units (that constitute a sample) for analysis. The analytical units may be tested individually, or composited as directed in specific methods or sampling plans. The analytical unit may be considered the sub-sample when it is a portion of the analytical unit required for analysis.
- Sample unit: Sample unit is one of a number of individual containers, or a portion of a food or primary container examined or evaluated as a single unit. The sample unit may be considered the sub-sample when a portion of the sample unit is required for analysis.
- Sub-sample: A specific portion of the analytical unit or sample unit required for the analysis. A specific number of sub-samples will be required to make up the complete unit for analysis.
- Sample collection
- The collection of samples which are submitted to a laboratory for analysis.
- Sample collection procedures
-
- As required samples: An inspector may collect an as required sample when suspected problems need to be investigated and/or verified. As required samples are normally unplanned and are required to respond to an event (for example, a complaint, a failed monitoring sample or when a potential non-compliance is identified). Directed or follow-up samples may fall under the scope of as required sample collection.
- Planned samples: An inspector may collect planned samples as part of the annual work plan (for example the National Chemical Residue Monitoring Program (NCRMP)). Sample cases are uploaded into the Digital Service Delivery Platform (DSDP) system at the beginning of the fiscal year. Monitoring samples fall under the scope of planned sample collection. Directed samples that are targeted may also fall under the scope of planned sample collection.
- Official samples: An inspector may collect official samples when referral of the file to Enforcement and Investigation Services (EIS) may follow. Evidentiary or legal samples are other terms that may be used interchangeably with official sample collection.
- Sample size (n)
- The number of sample units comprising the total sample drawn from a lot or production.
- Sampling plan
- The sampling plan specifies the number of sample units required and criteria (acceptance and rejection) to make an accurate inspection decision on a lot.
- Sample unit size
- The quantity (g or ml) of a particular food portion or container selected as a sample and from which one or more units will be taken for analysis.
- Test detection limit
- The limit of detection is generally defined as the lowest quantity or concentration of an analyte that an analytical method can reliably detect.
5.0 Acronyms
Acronyms are spelled out the first time they are used in this document and are consolidated in the Food business line acronym list.
6.0 Operational guidance
This operational guidance provides inspection guidance specific to food sample collection and is to be used by CFIA inspection staff when conducting sample collection activities.
This operational guidance applies to samples collected at all regulated parties (including SFCA license holders and non-license holders), at all levels of distribution (including retail, manufacture, import and storage).
6.1 Prepare for the inspection
Refer to SIP, Section 3, Step 1. In addition to the general guidance provided in SIP, the following guidance applies to sample collection.
Inspectors should consult with their supervisor, Regional Program Officer (RPO), Area Recall Coordinator (ARC) / Regional Recall Coordinator (RRC), Regional Coordinator (RC), the Office of Food Safety and Recall (OFSR) and Laboratory Coordination Division at any point in the sampling process if questions arise.
6.1.1 Determine the scope
Inspectors must determine the scope by considering which sample collection procedure to use, what techniques and types of sample analysis are required, and if any commodity specific sampling methods are needed for the sample collection activity.
Procedures:
There are three sample collection procedures that should be consulted depending on the purpose of the sample collection activity. See Table 1 for a list of the procedures that may be referenced when collecting a sample.
| Sample Collection Procedures: | Applied when: |
|---|---|
| Operational procedure: Planned food sample collection |
|
| Operational procedure: As required food sample collection |
|
| Operational procedure: Official food sample collection |
|
Techniques:
Different sample collection techniques are used during sample collection, depending on the design and the purpose of the sampling and testing. Refer to Table 2 for a list of specific sample collection techniques.
| Sample Collection Technique: | Applied when: |
|---|---|
| Aseptic sample collection (Appendix 1) | Microbiological analysis of sample is required |
| Core drilling sample collection (Appendix 2) | It is necessary to drill, saw or cut the item being sampled; used for frozen and hard blocks of food |
| Environmental sample collection (Appendix 3) | Analysis is required to determine the presence of pathogens on equipment and food contact surfaces |
| Random sample collection (Appendix 4) | Sample must be representative of a larger sample or a population |
| Water and ice sample collection (Appendix 5) | Sample must represent the quality of the water source and the characteristics of water used as an ingredient and/or in treatments/cleaning |
Additionally, there are different types of sample analyses which could be conducted on the food samples collected, such as:
- allergen
- chemical
- microbiological
- extraneous material
- radiation
Refer to Appendix 6 – Types of analyses conducted on food samples for further guidance.
Methods:
There are different sample collection methods used during sample collection activities, depending on the commodity being sampled. Refer to Table 3 for suggested commodity specific sampling methods.
| Sample Collection Method: | Applied when: |
|---|---|
| Canadian Shellfish Sanitation Program (CSSP) sample collection (Appendix 7) | CFIA inspectors conduct sample collection activities at the harvest location following the CSSP manual of operations |
| Dairy products sample collection (Appendix 8) | CFIA inspectors conduct sample collection activities at dairy establishments |
| Fish and seafood sample collection (Appendix 9) | CFIA inspectors conduct sample collection activities at fish and seafood establishments |
| Fresh fruit and vegetable sample collection (Appendix 10) | CFIA inspectors conduct sample collection activities at the field and fresh fruit and vegetable establishments |
| Honey sample collection (Appendix 11) | CFIA inspectors conduct sample collection activities at SFC licensed and non-SFC licensed honey establishments |
| Maple sample collection (Appendix 12) | CFIA inspectors conduct sample collection activities at SFC licensed and non-SFC licensed maple establishments |
| Meat and poultry products sample collection (Appendix 13) | CFIA inspectors conduct sample collection activities at SFC licensed and non-licensed meat and poultry establishments |
| Processed egg products Sample Collection (Appendix 14) | CFIA inspectors conduct sample collection activities at processed egg establishments |
| Processed fruit and vegetable products sample collection (Appendix 15) | CFIA inspectors conduct sample collection activities at SFC licensed and non-SFC licensed processed fruit and vegetable establishments |
| Shell egg sample collection (Appendix 16) | CFIA inspectors conduct sample collection activities at SFC licensed shell egg establishments |
6.1.2 Prepare the toolkit
Once the procedures, techniques and method(s) of sample collection are determined, perform the following in-office steps:
Plan sampling activities, whenever possible, so that samples are not stored or shipped over the weekend. In some cases, the laboratory will accept samples for analysis on the weekend. Consult with supervisor and laboratory contact or coordination unit to confirm resources are available and sample can be assessed for any unscheduled or unplanned sample collection.
Prepare the Inspector toolkit, ensure sampling materials are selected as appropriate for the preparation, collection, storage and transportation of samples and for maintaining their condition. Refer to the Inspector toolkit (accessible only on the Government of Canada network – RDIMS 11289973) for a list of equipment that may be required for sampling. Follow appropriate biosecurity (accessible only on the Government of Canada network – RDIMS 7500000) measures for preparation, cleaning and sanitizing equipment, prior to arriving at the establishment.
Acquire or assign an appropriate series of laboratory sample numbers to be used to uniquely identify the samples. Refer to Food inspection guidance: sample collection (accessible only on the Government of Canada network) and Sampling activities, plans and manuals (accessible only on the Government of Canada network) for guidance on lab sample numbers and how to proceed if additional samples per sampling plan are required and for special request sampling procedures.
Determine if sampling assessment criteria is available for the samples being collected. Refer to the plans and manuals found in CFIA sampling information (accessible only on the Government of Canada network).
Determine if the sample will require a payment or receipt once collected:
- Sampling activity is within CFIA authority (receipt (CFIA/ACIA 4168) required)
- Sampling activity is outside CFIA authority (payment required). Refer to Appendix 16: CFIA payment for food sample collection for further guidance.
Maintain upkeep of the equipment and instrumentation used for sample collection to ensure it is designed, constructed, installed, maintained and calibrated such that it is capable of functioning as intended, thereby ensuring product safety, integrity and sample assessment accuracy. For example, augers must be sharp, free of cracks or chips and maintained appropriately.
6.2 Conduct the inspection
Refer to SIP, Section 4, Step 2. In addition to the general guidance provided in SIP, the following guidance applies to sample collection.
6.2.1 Select a product to sample
The inspector should always select which product to sample and ensure there is no bias. For example, the regulated party should never influence the inspector on which samples to select or choose the samples on the inspector's behalf.
Determine which product to sample and size of sample required based on the following considerations:
- The product and size of sample to be collected may be dictated or impacted by the:
- Type of sample analysis required (refer to Appendix 6 Types of analyses conducted on food samples)
- Sample collection procedure (refer to Table 1)
- Sample collection technique (refer to Table 2)
- Commodity specific methods required (refer to Table 3).
- Compliance history and risk
- Type of sample being collected, activities conducted by the regulated party, production processes and/or treatments involved
- Hazards, risk mitigation and control measures normally associated with the sample / treatment / process
- Sample task type(s) assigned for completion
- Policy or regulatory requirements
- History of past non-compliances for the sample type and/or regulated party
- Sample integrity (unless directed, samples should not be collected from potentially contaminated product (example from retail bulk bins))
- Date the product was last sampled at the premises
- Any other circumstance the inspector may be aware of
6.2.1.1 Define the sample unit
A sample unit may be one of a number of individual containers, or a portion of a food or a primary container examined or evaluated as a single unit.
Sample units may consist of:
- a whole fruit, vegetable or natural bunch (such as grapes)
- a whole animal or complete animal part or organ
- a pre-packaged product
- very small packages and/or multiple packages may be combined to form one sample unit to meet required sample size
- smaller portions taken from bulk materials and large packages (such as drums, cheeses, etc.) which are individually too large to be taken as samples (sample extracted and placed in appropriate containers to form sample unit)
- a larger sample size container may be selected as the sample unit if smaller units are not available
- If more than one sample unit is required, it may be necessary to ensure that each sample unit (or sub-sample) is sampled from a different container, regardless of the container size
6.2.1.2 Determine the number of units in the lot (lot size)
Lots are typically differentiated by logical breaks in production and may be further identified in the Sampling Guidelines and Assessment Criteria (SGAC).
When there is no code identification, a lot may be considered as the quantity of:
- product produced under essentially the same conditions, at the same establishment and representing no more than one day's production;
- the same variety of product and the same manufacturer available for sampling at a fixed location; and
- product that for any reason is considered separately for inspection
Examples of a lot may include:
- an entire train car of product
- packages of product with certain code labels
- a manufacturer's production for a given day
Each lot should be prepared for sampling in such a way that the sample(s) can be taken without hindrance. If a portion of the lot has already been distributed, the remaining quantity of the lot is to be considered the sampling lot.
The inspection lot size may be calculated by:
- number of units in the lot = number of pallets × number of cases per pallet × number of units per case
6.2.2 Collect the sample
Inspectors must follow principles of good personal hygiene when performing food sample collection tasks. The inspector must not be a source of contamination and should follow the principles below:
- Personal hygiene and biosecurity (accessible only on the Government of Canada network – RDIMS 7500000):
- Keep hands, fingernails, clothing, and shoes / boots thoroughly clean at each inspection
- Remove personal effects and jewellery prior to collecting a sample or secure effects that cannot be removed (under clothes or gloves)
- The inspector should not collect samples if they are suffering from a cold or flu or are afflicted with skin infections or gastro-intestinal illness
- Follow the biosecurity protocol as directed by the regulated party
- Wear PPE as required:
- PPE must be clean and in good condition and, where required, disinfected
- Additional consultation may be required if the sample presents a safety risk or shipping hazard
Inspectors must take samples in a sterile manner:
- Whenever possible, sample units should be sampled in a clean area of the establishment
- All pre-packaged sterile sampling equipment should have packaging that is intact and if there is an expiration date, it must not be expired
- If pre-sterilized pre-packaged sampling tools (for example, gloves, tongs, forceps, drills, augers) are required and unavailable, sampling equipment may be autoclaved or sterilized with 70% alcohol, or food grade sanitizer, immediately before use:
- Ensure sampling tools are clean and dry (no accumulated material present)
- Sterile lint-free wipes may be used to dry sampling tools
- Flaming or the use of 95% ethanol is not recommended
- Other options may be used provided they will not contaminate the sampled food with biological or chemical hazards and the sanitizer residue will not affect the analytical results
Inspectors must collect samples in an accurate and reliable manner to protect the integrity of the sample and to avoid cross-contamination. Analytical results depend on proper sampling. The following are examples of proper sampling steps:
- Collect samples when the lot can be accessed without interference
- If there are conditions that cause interference with sampling, document the issue and report the issue to the Inspection Supervisor
- Begin the sampling sequence in the finished product area first (least contaminated) and proceed through the potentially contaminated areas, finishing at the raw materials and receiving areas.
- Use sterile containers as required (for bulk samples / raw materials)
- Individual and non-composite samples must be packaged separately
Note: Any product that is clearly non-compliant (for example, non-compliant container size requirements), is not recommended to be sampled. It is recommended that only once that known non-compliance is corrected, should it become subject to sampling activities.
6.2.3 Transporting and storing the sample
Inspectors must maintain the temperature and integrity of the sample associated with the lot, from the time the sample is drawn to the point at which the sample is delivered to the laboratory for analysis:
- Ensure the sample is protected from environmental and physical damage
- Samples should be kept and packaged in such a manner that the controlled characteristic is not modified
- Transport samples in clean and dry containers offering adequate protection from cross contamination, external contamination and protection against damage to the sample
- Refrigerated or frozen samples should be transported in insulated containers with a sufficient quantity of ice packs or dry ice to maintain sample integrity and the same conditions under which they were sampled
- If samples are not shipped immediately, store them in a secure location in the office:
- Keep frozen samples in a freezer (-18°C)
- Keep refrigerated samples at an appropriate temperature (0 to 4°C)
- Keep samples which do not require refrigerated storage conditions at ambient room temperature
6.2.4 Capturing notes related to sample collection
Inspectors must fully document sample collection activities in their notebooks or electronically. The following are examples of information that should be documented and entered into Laboratory Sample Tracking System (LSTS) / DSDP / Issues Management System (IMS) where applicable:
Regulated Party Details:
- Box Name
- Box Address
- Box License number, if applicable
- Box Telephone number(s) [identify work, home, cell]
- Box Email address
Sample Collection Details:
- Box Address of sample collection / harvest area
- Box Date and time of sample collection / harvest date
- Box Scope, procedure and techniques used
- Box Number of samples drawn
- Box Lot size (number of cases, number of containers per case)
- Box File or case numbers associated with the samples (LSTS/IMS/DSDP)
- Box Type of sanitizer used
- Box Type of gloves used (sterile, sanitized)
- Box Expiration date and lot code of sampling equipment and supplies
- Box Payment method (was payment required or receipt (CFIA/ACIA 4168) issued
- Box Package / container type
- Box Country of origin and/or destination
- Box Grower / field crop ID
- Box Dealer ID
- Box Lot code / unique identifier
- Box Product storage prior to preparation (container, temperature, segregation)
- Box Condition of product upon opening (off flavours, odours, colour, gas, etc.)
- Box Package integrity (sealed, vacuum, swollen, leaking)
Label information (or maintain a copy):
- Box Brand name
- Box Common name / variety / species / product type
- Box Net quantity / unit size
- Box UPC
- Box Best before date / expiry date / use by date / durable life date
- Box Organic status along with certification body information
Record any deviations from normal procedures and include any other relevant information which would assist in performing the analysis or assessing the results.
Photographs should be taken of all samples and included with the inspectors notes on the activity.
6.2.4.1 Record information
LSTS is the primary system for tracking sample information and the resulting laboratory assessments.
Refer to the LSTS User Services User Guide (Manage samples (accessible only on the Government of Canada network – RDIMS 3495373) for instructions on how to record sample collection data in LSTS.
Samples should be tracked in the DSDP and/or IMS depending on the reason for the sample collection.
Please refer to the following documents for further information, as required:
- DSDP – Standard Operating Procedures (SOP) Manage samples (accessible only on the Government of Canada network – RDIMS 9852138)
- Issues Management System User Manual (accessible only on the Government of Canada network – RDIMS 1599661)
- Business Rules of Use for the IMS (accessible only on the Government of Canada network)
- Operational procedure: As required food sample collection
- Operational procedures: Official food sample collection
- Operational procedure: Planned food sample collection
- Operational procedure: Responding to food complaints (accessible only on the Government of Canada network – RDIMS 13899359)
6.2.5 Packaging, handling and shipping the sample to the laboratory
To preserve the integrity of samples during shipping, extreme care should be taken to ensure that they remain intact and at a proper temperature while in transit to the laboratory.
- Avoid the possibility of cross contamination of the sample and/or sub-sample:
- Individual and non-composite samples must be packaged separately
- Choose shipping coolers and containers that are:
- Dry, leak-proof and sealable to prevent cross-contamination
- Do not ship different products in the same shipping cooler/container if there is a risk of cross-contamination
- Appropriate for your sample size and the number of samples being sent
- If more than one shipping container is required, clearly indicate the container number and total number of containers on each box/cooler, courier waybill, and LSTS form
- Dry, leak-proof and sealable to prevent cross-contamination
- Insert the completed LSTS sample submission form in a plastic bag to protect it from being damaged, and place it inside the shipping cooler/container
- Pack samples tightly to prevent shifting within the shipping container
- To properly secure samples:
- Use clean, dry, polystyrene foam nuggets, bubble wrap, or other suitable packaging material
- Place each glass jar / bottle in a separate bag
- Ensure liquid samples are not leaking or over filled
- Pack sufficient amount of coolant material, such as pre-frozen ice packs, to ensure samples are maintained at the proper temperature through to arrival at the laboratory
- Coolant material must not directly touch the samples. To prevent freezing, place a thin layer of material (for example, newspaper) around the frozen ice pack
- During warmer months, place empty shipping containers in a freezer long enough to chill them thoroughly prior to use; additional ice packs may be required to maintain proper temperature
- During cooler months, additional material may be used to insulate the cooler and expedited shipping options may be required for samples that may be damaged by freezing
- When dry ice is used to ship frozen samples, avoid direct contact with the samples. Refer to Shipping Foods with Dry Ice (accessible only on the Government of Canada network – RDIMS 3219726) for further guidance.
- Coolant material must not directly touch the samples. To prevent freezing, place a thin layer of material (for example, newspaper) around the frozen ice pack
- To properly secure samples:
- Address the shipment to the appropriate lab personnel and include a contact phone number if possible
- Determine if the laboratory requires confirmation of samples in transit and estimated arrival
- Fish and fish product samples may require this notification
- Unplanned and unscheduled samples may require this notification
- Important Note: the laboratory is not automatically notified when an LSTS submission form is created – please contact the lab directly when required
To avoid sample rejection and having to electronically re-submit the sample forms and/or collect and ship another sample, refer to Table 4 for suggested best practices for sample submission.
| Best practice | To avoid |
|---|---|
Use appropriate packaging material to avoid damaged or broken sample containers:
|
Sample rejection. Inspector must re-collect and resubmit the sample. |
| Ensure sub-samples are taken when required | - |
| Ensure sample lots are maintained and documented | - |
| Ensure minimum sample weights are collected for analysis | - |
Ensure shipping information is correct and accurate:
|
- |
| Ensure information on LSTS sample submission form is accurate (for example, the correct sample type is submitted) | Sample rejection, inspector must resubmit the sample form electronically |
Ensure samples are coded properly:
|
- |
Important Note: The first part of the sample collection task is now complete; the sample has been collected and sent to the lab for analysis. The second part of the sample collection task will be initiated once the sample results are received.
6.2.6 Evaluating Sample Result
Laboratories will assess samples using approved methodologies, based on the sample and analysis for which the sample was submitted. The results of the laboratory analysis will be communicated to the inspectorate in one of several ways such as:
- LSTS Report of Analysis (ROA)
- Programs and Policy Branch report
- National Microbiological Monitoring Program (NMMP) quarterly delivery and compliance reports
- Chemical Residue Violation Report
It is important to note that CFIA laboratories do not email LSTS results directly to inspectors.
PENMAN (accessible only on the Government of Canada network – RDIMS 3495373) is a function of LSTS that allows CFIA staff to receive e-mail notifications of authorized laboratory results. Each result notification will provide a link to the Report of Analysis for the sample.
Laboratory results can be expressed in various ways in laboratory reports; by individual analytical unit or by a composite sample.
The laboratory will generate one of four possible assessment results as described in Table 5 or will assign a non-assessment result as described in Table 6.
It is important to remember that the sample assessment may not be directly related to compliance.
| Assessment result | Definition |
|---|---|
| Satisfactory (S) | A result which is considered satisfactory based on established predetermined assessment criteria (for example, legislated standards, directives and/or policies). Satisfactory results are not entered into DSDP and would not need to be communicated to the regulated party unless the product was voluntarily held or detained pending results. External LSTS (ROA) may be provided to regulated party if requested. |
| No decision (ND) | A result in which no decision has been made by the lab due to:
Further assessment should be completed following a no decision result
|
| Investigative (I) | A result which is considered neither satisfactory nor unsatisfactory by established or predetermined assessment criteria (for example, legislated standards, directives and/or policies). More information is required to determine if the sample is compliant. Continue with inspection activities to collect supplementary objective evidence to support the determination of compliance and enter the compliance decision in DSDP. Refer to the SIP Section 4.6 for more information. |
| Unsatisfactory | A result which is considered unsatisfactory by established or predetermined assessment criteria (for example, legislated standards, directives and/or policies). In most cases, unsatisfactory results indicate that the sample is non-compliant. In some circumstances, further evaluation by the inspector may be required to determine compliance and/or whether a potential health and safety concern exists. When a potential health and safety issue is identified, consult the Standard Regulatory Response Procedure (SRRP) and follow the guidance in the Food Incident Response Process (FIRP), and any Food or Commodity specific guidance to help identify any regulatory response options and strategies. When a potential health and safety issue is not identified or a recall is not warranted, other regulatory response actions may be required to address unsatisfactory sample results. |
In some instances the laboratory may analyze the sample; however, reporting of an assessment result is not possible or applicable. In this case, the laboratory report may provide non-assessment results as defined in Table 6.
| Laboratory analysis | Definition |
|---|---|
| Above or below average | Term typically used to report results for environmental contaminants. These results are not reported on the Monthly Chemical Residue Violation Report; however, they are sent to Health Canada for their annual evaluation. |
| Not detected | When the laboratory result is reported as not detected, the contaminant may be:
|
| Presumptive Positive | Any positive signal obtained from a validated indirect or screening method (For example, DNA amplification, surface antigen detection, etc.). Such signals are confirmed with follow up tests. |
| Quantitative Result | Number of microorganisms (CFU/g) per ml or g or concentration of residue (100 ppm) |
| Unsuitable sample (rejected) | Sample was not assessed as the sample arrived to the laboratory in a condition that made the sample unsuitable for further analysis Sample must be re-collected and resubmitted Important note: If is a sample submission is rejected due to errors in the submission form, the form may be corrected and re-submitted electronically and the sample will then be assessed |
| Violation / Violation above action level / Violation banned substance / Violation below action level | Refer to Appendix 1: Overview – Sample collection plans and Appendix 2: Management and assessment of Sample Collection Plan sample results – CFIA national programs of the Operational procedure: Planned food sample collection. |
If the inspector requires assistance to evaluate the sample result, they should consult with a supervisor, laboratory contact or subject matter expert (SME) through established communications procedures.
6.2.6.1 Determine if immediate control action is required
If sample results indicate the need to control a potential risk, inspectors will follow the FIRP. Refer to SIP Section 4.5.
Important Note: Sample collection is part of the SIP; however, responding to risk is part of the Standard Incident Response Process and control and enforcement is part of the SRRP.
6.2.6.2 Determine compliance
The inspector is required to review the results to determine compliance based on the reason for sampling. Refer to SIP Section 4.6 and Table 7 which provides examples of additional steps that may be required to determine compliance.
| If sample results indicate: | Then: |
|---|---|
| The need for objective evidence to support the determination of compliance, for example if the samples result is reported as investigative. | Inspectors will refer to and follow:
|
| That there is no assessment decision taken by the laboratory. | The inspector will consult commodity specific guidance and their supervisor / regional program officer or designate to determine if further action is required. |
| The sample result is unsatisfactory. | Inspectors will evaluate the sample results against regulatory requirements. The inspector will determine if next steps are required to gather supplementary objective evidence to determine compliance. These steps may include:
|
Sample results reported as anything other than satisfactory require further action and must be documented in a DSDP Sample Collection case and/or in IMS.
If a sample is non-compliant consult the Operational guideline: food regulatory response guidelines and SIP, Section 4.7. A non-compliance record must be created in DSDP and/or the IMS file must be updated accordingly.
Important note: Inspectors may capture more than 1 regulatory reference in a non-compliance record. When a non-compliance record has more than 1 regulatory reference with supporting objective evidence, the categorization of the non-compliance should be based on the sum of all the documented objective evidence within that non-compliance record.
6.3 Communicate the inspection results
Refer to SIP, Section 5, Step 3. In addition to the general guidance provided in SIP, the following guidance applies to sample collection.
All sample results reported as anything other than satisfactory should be communicated to the regulated party.
Important note: The external LSTS ROA may be provided to the regulated party, when the sample is analyzed by a CFIA laboratory. For samples analyzed by third party contract laboratories, an external ROA is available upon request for sample results reported as anything other than satisfactory.
Important note: In some instances, when non-compliant samples are identified, Area / Regional Operations may communicate the results to the appropriate Provincial authorities for follow-up.
6.4 Conduct the follow-up inspection
Refer to SIP Section 6, Step 4.
For general inquiries related to this Operational Guidance, follow established communication channels including the submission of an electronic Request for Action Form (e-RAF) (accessible only on the Government of Canada network).
7.0 Appendix
Appendix 1: Aseptic sample collection
An inspector must conduct aseptic sample collection when the sample is required to accurately represent microbiological conditions at the time of collection.
Aseptic sample collection avoids the introduction of external microorganisms during the sampling process by:
- Sampling the final product that is in intact and pre-packaged, if possible
- Ensuring protective clothing, footwear, coolers, ice packs and sampling gear are clean and sanitized (as appropriate), to avoid contaminating the sample
- Using only sterile sampling equipment and containers
- Contacting the source material and the sample only with the sampling tool and/or the container
- Process controls must be in place to prevent cross-contamination between different production lines
- Minimizing exposure of the product, sampling equipment and the interior of sampling containers to the environment
In addition to section 6.2 Conduct the inspection, the following considerations should be taken into account for aseptic sample collection:
- Collect the sample in a manner that ensures there is no contamination of the sample or the product being sampled
- Maintain the sample under conditions which will preserve the original microbiological profile as completely as possible (such as recommended storage conditions)
- Refrigerated samples: Maintain the sample between 0 to 7°C, ideally at a maximum of 5°C. Analysis of unfrozen product should take place within 24 hours of sampling. It is recommended that samples be submitted to the lab from Monday to Wednesday, unless specific arrangements are made. Do not freeze samples without consulting the laboratory. Reports must state whether or not the samples have been frozen
- Frozen samples: Maintain the sample at 0°C or less
- Change sterile tools (such as forceps) and gloves after each aseptic sample is collected
- Sample containers must be securely sealed after filling so that they do not leak or become contaminated during further handling or transportation
Aseptic sampling of foods in microperforated packaging
Food packaging containing microperforations are used for perishable food products such as fresh fruits and vegetables, salads, and baked goods, to extend product shelf life. Due to the presence of the microperforations, this type of packaging is not considered secure against the entry of microorganisms.
When collecting, preparing and submitting food samples in microperforated packaging, extra care must be taken to prevent product contamination:
- Place each sample in a separate labelled sterile bag
- Use clean and disinfected cooler and ice packs
In addition, aseptic sampling techniques for foods in microperforated packaging may include taking representative samples from closed shipping containers:
- If shipping containers are open on one or more sides, select samples from containers that are protected from exposure during shipping and storage (for example, select from containers located immediately behind cellophane that is used to wrap the pallet, or select from containers that are within the centre of the pallet)
In addition to the details outlined in section 6.2.4 Capturing notes related to sample collection, the inspector may be asked to provide the following to confirm the sample was collected in an aseptic manner. For example:
- A detailed description of how samples were selected and collected
- Photos and notes of:
- the pallets from which shipping containers were selected
- the location of the shipping containers on the pallet
- the closed and cellophane protected shipping containers from which samples were taken
- the sample within the shipping container
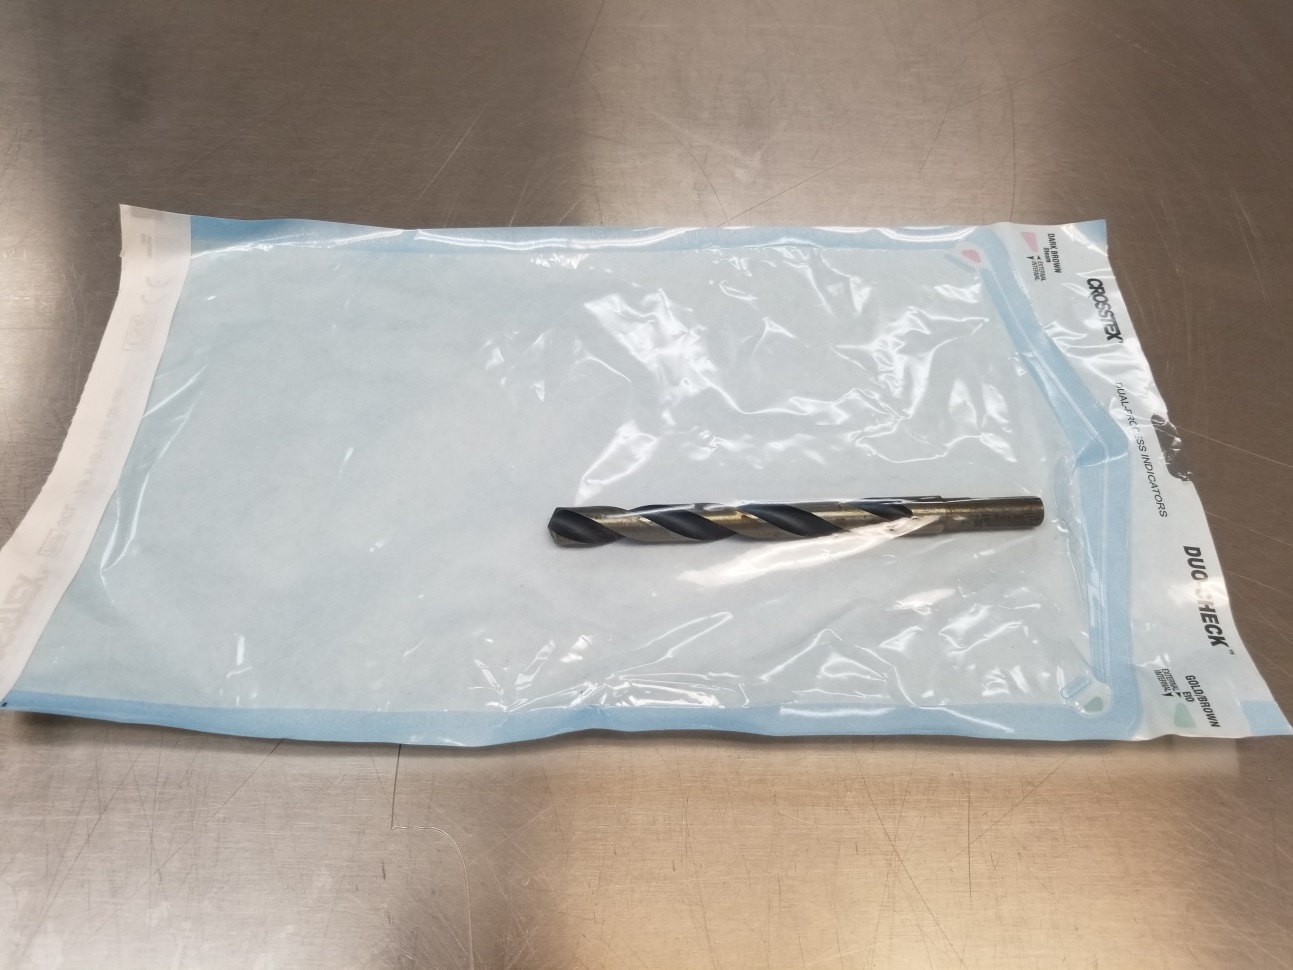
Appendix 2: Core drilling for food samples
Core drilling is used for sampling of large volumes of frozen foods or solid food products in pails, cartons or combo bins that cannot be readily cut with a knife and which have a uniform consistency.
Sample collection is conducted by using pre-sterilized stainless steel equipment (for example, bits, blades, knives), no wooden handles.
Food product types that may require core drilling for sample collection include:
- Dairy: Blocks / wheels of hard, aged cheeses that cannot be readily cut with a knife, or containers of frozen dairy products (for example, bulk butter)
- Egg: Frozen liquid processed egg products
- Fruit or vegetable products: Frozen, processed fruit or vegetables that are uniform in composition. For example, frozen fruit puree, blocks of frozen spinach
- Fish: Frozen fish products that are uniform in composition (for example, frozen minced fish). Sampling by core drilling is not acceptable for frozen containers of whole fish
- Meat: Large frozen containers of meat products that are uniform in composition (for example, ground meat, meat trim)
Sample Preparation
In addition to the list of equipment found in the Inspector toolkit (accessible only on the Government of Canada network – RDIMS 11289973) this technique may require the following clean, dry and sterile equipment:
- Electric drill with the following features:
- variable speed: minimum 1800 rpm
- minimum 12 volts
- weight: if > 1.6 kg, auxiliary handles for stability are desirable
- chuck size: minimum ½ inch to permit use of larger sized bits
- keyless chuck
- position of the air exhaust: should not vent downward onto the frozen food product
- 2 rechargeable battery
- Auger (drill bits) with the following features:
- length: 20 – 40 cm
- dimension width: minimum 0.5 cm difference in inner/outer diameter
- materials: high quality, nickel platted or stainless steel (no coatings such as paint or black oxide which may not withstand sanitizing, sterilizing or autoclaving temperatures)
- Sampling funnel
- wide enough at funnel stem for drill auger to be inserted without contact
- made of polypropylene (# 5 code for recycling) or other materials capable of being autoclaved
Sample collection
In addition to section 6.2 Conduct the inspection, for core drilling, the following considerations should be taken into account when aseptic sample collection is required:
- It is recommended that two inspectors conduct sample collection when using funnels and augers
- The inspector handling the drill conducts all procedures that do not require contact with the sterile equipment
- The second inspector maintains aseptic sampling procedures
- Expose the area of the frozen food to be sampled
- Prepare the sample bag so it is ready to receive the product from the funnel
- Prepare the sterile auger by:
- removing the auger from the autoclave bag by opening the top of the bag to permit the exposed end to be inserted into the drill chuck, or by
- removing the sanitized auger from the sanitizing solution and allowing it to air dry prior to use
- Prepare the sterile funnel by:
- removing the sterile funnel from the autoclave bag, or by
- removing the sterile funnel from the sanitizing solution and allowing it to air dry prior to use
- Place small end of the funnel on the exposed surface of the food
- Hold the funnel in place and drill through the funnel hole into the product
- Shavings of the product will deposit into the funnel
- Transfer product collected in the funnel into a labelled sterile sample bag
- Repeat drilling procedures for the next sample unit with sterile equipment

Appendix 3: Environmental sample collection
Environmental sample collection is used to determine the presence of pathogens or other organisms on equipment and food contact surfaces. The detection of microorganisms may indicate poor sanitation or microbial growth niches in a food establishment. Environmental sampling consists of Food Contact Surface (FCS) and Non-Food Contact Surface (NFCS) sampling.
Sample preparation
- Obtain a copy of the regulated party's environmental sampling program, if available
- Acquire a process flow chart, if available, including the employee and product traffic patterns
- Identify sampling sites and target microorganisms or hazards. Sampling sites may include areas such as walls, floors, drains, equipment, food contact surfaces
- To assess cleaning and sanitation conditions in the facility, plan to take environmental samples immediately after cleaning and sanitation, but before production starts
- To assess microbiological conditions during production, plan to take samples during production, typically 3 hours or more after start of operation or after the second half of the production period, if less than 3 hours
- To assess the adequacy of the hazard analysis:
- for lines producing ready-to-eat (RTE) products subjected to a heat treatment process, plan sampling to start at the post-lethality step
- for lines producing RTE products not subjected to a heat treatment process, plan to take samples at the step where the product is in its final RTE form. For example, for cold-smoked fish, sampling should start after the cold smoking step; for sushi, sampling should start at the step where all the ingredients are assembled as sushi
- Identify the line(s) with higher risk and select the collection sites (food contact surfaces only) in the post-lethality treatment areas of the establishment with the highest probability of contamination
In addition to the list of equipment found in the Inspector toolkit (accessible only on the Government of Canada network – RDIMS 11289973), the inspector must assemble their own Environmental Sample Collection Toolkit that includes:
- polystyrene foam shipping cooler
- ice packs (frozen)
- sterile gloves (at least 1 glove per sample site)
- sterile CFIA swabs (at least 1 per sample site)
- sterile sampling bags or containers, as required
- sampling equipment as required (for example, tongs, forceps)
- 70% ethanol spray solution or sanitizer, as required
Important notes:
- CFIA swabs can be ordered by following this guidance: Environmental Swabbing Kit and Ordering Process (accessible only on the Government of Canada network – RDIMS 3413640)
- Currently, only the pre-moistened sterile sampling swabs with a quick release handle will be provided by Science Branch; the assembly of the inspection toolkit for environmental sampling is the responsibility of Operations
- Swabs are shipped and can be re-shipped at room temperature. The total combined time at room temperature must not exceed 10 days in order to maintain the shelf life of the product. Once received, the swabs need to be stored refrigerated at all times
Selection of Food Contact Surface (FCS) sample
Prior to sample collection, survey the processing line to determine sites to be sampled:
- Select sites that are exposed to both the environment and the product or where there is a higher probability of RTE product contamination and the greatest potential to affect the safety of the final product
- Suggested food contact surfaces include:
- utensils (knives, trays)
- employee gloves / hands / aprons. Note that it is recommended to swab at random at least two employees that work in the establishment if these sites are selected
- slicers, dicers, shredders
- blades of slicers
- cutting tables
- carts / racks
- cheese molds
- conveyor belts
- scales (used to weigh RTE products before it is packaged)
- packaging tables
- packaging equipment (for example, vacuum packaging), packaging material
- Select 1 specific line. Give priority to the line most at risk, such as those packaging the highest risk cheeses in category 1, or to shredding, slicing and dicing operations where the risk of post-processing contamination is higher
- Ideally, 10 FCS sites should be selected (minimum of 5 FCS). The number of sampling sites will vary according to the complexity of processing system or packaging line
- Surfaces are to be swabbed after the start of the operations, 2 to 3 hours into processing is recommended
Surface contact sample collection: swab method
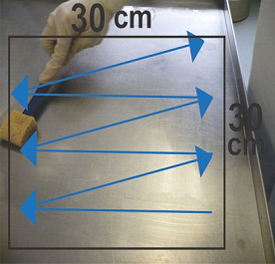
This method is used to sample any surface up to 1 meter squared (m2).
Important note: The environmental swabs should be used in accordance with the manufacturer's directions.
Ideally, a 900 cm2 (30 x30 cm or equivalent) surface should be swabbed whenever possible.
In addition to the information contained in section 6.2 Conduct the inspection and the techniques provided for aseptic sample collection in Appendix 1, the following should also be taken into consideration:
- Remove the pre-moistened sterile swab from the container using sterile gloves or tongs
- Rub the swab firmly and thoroughly over the surface to be sampled. Without lifting the swab, swab the surface area up and down until the whole target surface is covered (see Figure 3, Step 1), then turn over the swab and swab the surface area from right to left until the whole target surface is covered (see Figure 4, Step 2)

Important notes:
- Where the FCS being swabbed is cracked or has pre-drilled holes, focus swabbing on these cracks / crevices to target potential bacterial niches
- For surfaces which are difficult to swab because of their contour (such as conveyor belts), it may not be possible to swab a defined area using the procedure above. In this case, swab the area to be sampled using the same described technique (up and down / left to right) and then turn over the swab once again and swab the surface area in a diagonal pattern. This allows the sampling of every plane of the surface that will likely come into contact with the food (see Figure 5)

- Release the swab into the appropriately labelled sterile sample bag
- The stick (handle) of the swab must be removed after swabbing and prior to shipping the swab to the laboratory
- The original bag the swab is supplied in may be used for sample collection as long as it is able to be properly sealed and remains sterile
- If the bag becomes contaminated or another bag is required for any reason, that bag must also be sterile
- Sterile sample bags may be used or any other verified sterile container, as required
- Do not let the swab touch the outside of the bag
- Seal the bag, making sure not to contaminate the sample
- Place the bag in the polystyrene foam cooler
- Sanitize the sample site using a food grade sanitizer following environmental swabbing (note that some regulated parties may want to perform their own sanitation after CFIA swabbing)
- Change sterile forceps and/or gloves after each environmental sample is collected
- The sample should be well marked, for example, site location, conditions
- Samples should be submitted to CFIA labs as soon as possible after collection
Dried or accumulated material sample collection: swab method
In addition to surface sample collection, there may be evidence of dried or accumulated materials that support the growth of microorganisms on processing lines. Listeria monocytogenes has the ability to form biofilms and grow on food and food contact surfaces, particularly in areas where moisture and nutrients can accumulate, but are infrequently or inadequately cleaned.
The sample size of such material will be determined by the analysis required and/or the amount of sample available.
In addition to the information contained in section 6.2 Conduct the inspection and the techniques provided for aseptic sample collection in Appendix 1, the following should also be taken into consideration:
Select the environmental site for sample collection
- Determine what sterile materials / tools will be needed to collect the sample, for example, scraper, sweeper, tongs, forceps, spoons
- The sample should be well marked, for example, site location, conditions, etc.
- Change sterile tools (such as forceps) and gloves after each environmental sample is collected
Appendix 4: Random sample collection
This method is used in the majority of sample collection tasks when selecting a representative sample of a population. In order to achieve an unbiased sample, the selection has to be random so every unit from the population has an equal and likely chance of being added to the sample group. Select the samples as randomly as possible within the lot, given the constraints of working in a production facility or warehouse environment.
A true random selection of pallets and the selection of individual packages from each case can be achieved by using a serial number system and random number tables or a device such as a statistics calculator or computer with random number generation capabilities. The random selection of cases from the pallets can be conducted by using a lot numbering system and a random number generator.
Numbering systems
A numbering system for the lot must be decided upon before obtaining the random numbers for the sample.
Serial lot numbering
In a simple arrangement, such as packages on a shelf or on a packing line, the packages in the lot can be considered to be numbered from 1 to n, where "n" is the total number of packages. The inspector does not have to mark the packages with numbers, but each package should have a number assigned to it by memory. The packages may be arranged in some order to clarify the numbering system in the inspector's mind. A simple sketch on a piece of paper may also be useful.
If the packages are in only one layer, they may be found or arranged in rows and columns on the shelf. Imagine that the packages are numbered from 1 to 15 in some systematic fashion, as illustrated below:

If there is more than one layer of packages, extend the serial numbering system layer by layer. In this example, the second layer would be considered to be packages numbered 16 through 30, the third layer, packages numbered 31 through 45, the fourth numbered 46 through 60, and so on, as illustrated below:

The inspector may use any numbering scheme as long as each of the packages has a number associated with it. In the 4-layer system previously mentioned, where the total number of packages equals 60, package number 39 would be in the third layer from the bottom, second row from the front, fourth package from the left. In this example, the package is shaded and the number is in bold.
Obtaining random numbers for the sample
Once all of the packages in the lot have been assigned numbers (from 1 to n), it is necessary to obtain random numbers corresponding to the total number of required sample units as follows:
- If the lot contains 100 packages or less, use 2-digit random numbers (note "00" is the 100th package)
If the lot consists of more thannbsp;100, but not more than 1000 packages, use 3-digit random numbers (note "000" is the 1,000th package) - Using a random number generator (such as a random sample number table, statistics calculator, or computer), record random numbers which are less than or equal to the total number of packages in the lot
- Continue to record random numbers until you have enough for the amount of samples you need to take
- Rearrange the random numbers in ascending order to facilitate sample selection
For example, 5 sample units are to be collected from a lot consisting of 60 packages. Using the two-digit random sampling number table provided starting at the first number, on the top left-hand corner of the following table, and going from top to bottom, the following random numbers are recorded: 20, 22, 45, 44, 16. Sample units corresponding to the above random numbers should be collected.
Three-dimensional lot numbering
When a large stack of packages or cases must be numbered, the inspector can use a three-dimensional lot numbering system using the Right, Up and to the Back method, referred to as "RUB".
Obtaining random numbers for the sample
- Choose the lower left corner of the stack as a "zero point" or starting place
- Record the number of packages in the lot for each of the three directions (RIGHT, UP and BACK). For example, in Figure 2, there are 5 packages RIGHT, 4 packages UP and 3 packages BACK (5 x 4 x 3). At the bottom of the table in the spaces labelled "Dimensions of Stack," record the total number of units in each direction in the stack (this will aid in using the random numbers generated because numbers larger than this are unusable)
- Using the two digit random sampling number table provided below, begin generating random numbers by using every random number less than or equal to the dimension shown at the bottom of the worksheet and record those random numbers in the second column "Right" of the worksheet
- When the second column of the work sheet is completed, fill in the third column "Up" and then the fourth column "Back" using the same method
- If all the dimensions of the stack are 10 or less, use one of the digits of the random numbers found in the random sample number table. If any one of the dimensions is greater than 10 but not greater than 100, use a two digit random sample number table to generate the random numbers. If any dimension is greater than 100 but not greater than 1000, use a three digit random sample number table
For example, the dimensions of the stacked packages are 5 x 4 x 3 (60 packages). Below is a "Package Selection Worksheet" illustrating the 5 required sample units. The first sample package is 2 packages to the Right, 3 packages Up, and 3 packages Back from the starting point. The fifth sample package is 1 package to the Right, 2 packages Up, and 1 package Back from the starting point.
| Samples required | Package location: Right | Package location: Up | Package location: Back | Corresponding package # (Figure 7) |
|---|---|---|---|---|
| Sample #1 | 2 | 3 | 3 | 42 |
| Sample #2 | 2 | 2 | 1 | 22 |
| Sample #3 | 4 | 4 | 3 | 59 |
| Sample #4 | 4 | 4 | 1 | 54 |
| Sample #5 (Continue if a larger sample size is required) |
1 | 2 | 1 | 21 |
| Dimensions of Stack | 5 | 4 | 3 | 60 |

Appendix 5: Water and ice sample collection
Water and ice sample collection tasks evaluate the quality of the water source and the characteristics of water used as an ingredient and/or in treatments and cleaning.
Quantity and size of the unit sample are established according to the type of analysis done in the laboratory. Refer to the Food Sample Collection Plan (accessible only on the Government of Canada network) for additional information.
Sample collection
In addition to the information contained section 6.2 Conduct the inspection, the following should also be taken into consideration:
- Use a sterile container and do not rinse prior to sample collection
- When sampling water treated with chlorine, use a sample container with sodium thiosulfate to inactivate chlorine
- Refer to Appendix 1: Aseptic sample collection techniques if microbiological analysis is required
Running water source
- A sample, consisting of the required number of units drawn at random from each lot, shall be taken
- Each sample unit shall consist of at least 100 ml or g
- Collect the sample from a source water outlet within the facility
- Do not use a hydrant, hose or any faucet located outside of the building
- Do not sample from a tap that is obviously contaminated
- Request the regulated party to remove any aerators or other devices from the outlet to be sampled
- These devices may be heavily contaminated and may alter the water sample result
- Disinfect the end of the faucet with alcohol wipes
- Run the cold water for at least two to three minutes to ensure a representative sample from the tap and permit clearing of the service line
- Adjust the flow of the stream to ensure that no splashing occurs
- Fill the sterile container to the fill line or within 6 to 7 mm (1/4 inch) of the top. The sampling container should not be overfilled and contain 100 to 200 ml of water for routine analysis. If the sampling container is accidentally overfilled, discard the container and use a new sampling container
Ice for consumption
- A sample, consisting of the required number of units drawn at random from each lot, shall be taken
- Each sample unit shall consist of at least 100 ml or g
- Collect original unopened containers wherever possible
- Place each collected sample unit into a separate sterile container
- Do not allow sample units of prepackaged ice to thaw during shipment
Water and ice for processing / preserving sample collection
- A sample, consisting of the required number of units drawn at random from each lot, shall be taken
- Each sample unit shall consist of at least 100 ml or g
- Collect the sample at one source of processing water or ice in a single sterile container
- Samples of bulk ice should come from a storage area when in use
- If there are multiple processing water or ice sources (for example, well water, fresh and/or saltwater), sample from a different source during each inspection
- In the case of treated water, sample post-treatment
- Do not allow sample units of ice to thaw during shipment
Appendix 6: Types of analyses for food samples
Depending on the commodity and the reason for sample collection, there are several types of analysis that may be required on food samples:
Allergens
- Food allergens are proteins that provoke an immune response in allergic individuals. A food allergic reaction occurs when a food protein is mistakenly identified by the immune system as being harmful
Refer to Food Allergen Elisa methods used by the CFIA (accessible only on the Government of Canada network – RDIMS 12132117) for options on allergen testing.
Refer to the Food Sample Collection Plan (accessible only on the Government of Canada network) and Food incident response process for further guidance.
Microbiological analysis
- All samples must accurately reflect microbiological conditions at the time of sampling. To maintain sample integrity, follow section 6.2 Conduct the inspection and Appendix 1: Aseptic sample collection
Chemical analysis
- Sample units chosen for chemical analysis should not undergo any adulteration (such as rinsing with water) which may change the chemistry results
- To mitigate the risk of cross contamination, individual samples must be aseptically sampled and packaged in separate sample containers
Additives and compositional analysis
- Food additives are chemicals added to the product during processing in order to preserve it in some manner, modify the colour, modify the taste, or alter the characteristics of the product. The application methods for these substances may vary, which affects the distribution of the substance in the product. Examples of food additives include sulphites (bleaching agent), sodium benzoate (preservative), potassium nitrite (preservative), saccharin (sweetener)
- Compositional analyses are used to assess component content and express the nutritional value of a food. To determine compositional parameters in a food product, the amount (concentration, percentage) of ingredients, components and nutrients such as fat, protein, sodium, sugars, moisture are analyzed
Product safety parameters and drug residue analysis
- Product safety parameters are those parameters which are used to curtail bacterial growth in a product and prolong the product shelf life. They may be used in combination in a product or only one parameter may be controlled to prevent bacterial growth. Salt, water activity, and pH are included in this category
- Drug residue is residue that has resulted from the application of antibiotics or similar substances to animals (for example, cattle, fish, bees) to prevent or treat disease. Tetracyclines, sulfonamides, and chloramphenicol are included in this category
Chemical contaminants and indicators
- Chemical contaminants are substances which are present in the food products as a result of the environmental conditions to which the food was exposed (for example, sanitizer residues, heavy metals, marine biotoxins)
- Chemical indicators are substances which are produced from decomposition processes that occur in the food. Chemical testing is often used to corroborate results from sensory analysis. Quality indicators include histamine, indole, and total volatile base nitrogen (TVBN), patulin in apple juice, peroxide value
Extraneous material analysis
- Extraneous material can include many different types of materials. Materials that can be harmful because of their hardness, sharpness, size or shape are of particular concern. Examples of harmful extraneous materials include glass, wood-chips, insulation, metal, or sharp plastic. Refer to Section 3: Extraneous Matter in the National Sampling Plans and Assessment Criteria – Imported and Manufactured Food (IMF) (accessible only on the Government of Canada network) for further guidance
Radiation analysis
- Irradiation is regulated under FDR Division 26. Industry may make submissions to Health Canada to allow new uses of food irradiation. Health Canada will permit new uses of food irradiation only after a safety assessment, and only listed items may be irradiated
- The current list of foods that are permitted to be irradiated is found on the CFIA external website: Irradiated Foods
- Food may be exposed to ionizing radiation for a variety of purposes, including:
- to improve the safety of food by reducing levels of pathogens associated with food-borne disease such as Escherichia coli and Salmonella
- reduce microbiological growth causing spoilage and, thereby, extend shelf-life
- reduce insect infestation
- delay ripening of fruit and vegetables
Appendix 7: Canadian Shellfish Sanitation Program (CSSP) sample collection at harvest area
The Canadian Shellfish Sanitation Program (CSSP) manual specifies when samples are to be collected to support monitoring, classifying and controlling areas where bivalve molluscan shellfish are harvested.
Filter-feeding bivalve shellfish can cause illness in humans when consumed as they accumulate toxic substances from the water, such as:
- biotoxins (for example domoic acid, which is associated with amnesic shellfish poisoning (ASP))
- bacteria (for example salmonella)
- viruses (for example norovirus)
In addition to the list of equipment found in the Inspector Toolkit (accessible only on the Government of Canada network – RDIMS 11289973) these methods may require:
- shovel, clam hoe (or rake), a pitchfork, cut-off approximately 18′ from the tines and then bent at a 70 degree angle.
- blunt tool (to break the ice)
- buckets
- waterproof footwear
- waterproof tags
- copy of CSSP Sampling Licence from DFO
- Operational Health and Safety procedures for operation of a vessel
Refer to Food Sample Collection Plan (accessible only on the Government of Canada network) for additional information on sample assessment criteria.
In addition to the information contained in section 6.2 Conduct the inspection, the following is required when collecting samples at the harvest area:
- Collect the minimum of requested animals (this may vary depending on the reason for sampling and the species being sampled, refer to the CSSP Program Manual for more information)
- Collect live, intact and undamaged shellfish only; rinse off mud and debris as required at the harvest site
- Collect commercial size shellfish (when possible)
- Double bag each sample using heavy plastic bags (6 mil gauge) for shellfish collection to ensure that the shells do not puncture the plastic and compromise the sample integrity
- Shellfish may be shucked or unshucked and kept refrigerated or frozen (biotoxins only) provided the temperature is maintained until the sample is received by the laboratory for analysis
- Microbial analysis of shellfish, shucked unfrozen shellfish, and live shellfish must be initiated within 24 hours after collection
- To avoid cross-contamination, when possible, samples will be collected, packaged and shipped using aseptic techniques (Appendix 1), with minimal exposure of the product, sampling equipment, and the interior of the sampling containers to the environment.
- When analysis is unavoidably delayed beyond 24 hours, contact laboratory to determine next steps
Additional information on CSSP sample collection is located in the following references:
- Operational guideline: Developing a marine biotoxin monitoring control plan
- Operational procedure: Implementation of Memorandum of Understanding with samplers for the delivery of the Canadian Shellfish Sanitation Program
- Operational guideline: Monitoring for marine biotoxins in Geoduck in British Columbia
- Operational procedure: control response plan for molluscan shellfish test results exceeding Canadian maximum levels, standard or guidelines
- Canadian Shellfish Sanitation Program manual (CSSP)
Refer to Appendix 9: Fish and shellfish sample collection for information on sampling of shellfish for analysis at a licensed facility (for example for salmonella or Vibrio parahaemolyticus).
Appendix 8: Dairy products sample collection
In addition to the list of equipment found in the Inspector toolkit (accessible only on the Government of Canada network – RDIMS 11289973) these methods may require:
- sterile spatula
- sterile sampling spoon
- sterile cheese trier or knife
- sterile, sealable sampling bag
- drill and sterilized auger
Refer to Food Sample Collection Plan (accessible only on the Government of Canada network) for additional information on sample assessment criteria.
In addition to the information contained in section 6.2 Conduct the inspection and the techniques provided for aseptic sample collection in Appendix 1, the following is required when samples are collected:
Bulk butter
- Place the butter in a clean area that has been sanitized with food grade sanitizer
- Remove the spatula from the sterile wrapping.
- Pull back liner into position for sampling and position spatula in the butter.
- Open a sterile, sealable sampling bag.
- Using the spatula, remove sample from the corner of the block of butter, as this location will give a more effective detection of surface yeast or mould.
- Place sample into the sterile sample bag.
- Seal the sampling bag.
- Keep the samples cool by placing them in an insulated container.
Frozen bulk butter can also be sampled using a drill and a sterilized auger. Refer to Appendix 2: Core drilling for food samples.
Dry dairy powder
The sampling room must be clean, well-lit, and free from dust, odours, and excessive air currents. Do not sample in a damp storage room or where steam is discharged because dry milk absorbs moisture quite readily when exposed to the atmosphere, even for a relatively short period of time.
Dry dairy powder packaged in bags
- Using a sterile sampling spoon, first discard or push to the sides, the surface portion of the powder to a depth of at least 15 mm.
- Collect the required sample size.
- Transfer the sample to the sterile composite sample bag. The same sterile spoon can be used to collect all sub-samples that are mixed to create a composite sample.
In-line sampling of dry dairy powder
Samples may be taken by the operator in-line during packaging. If this is the case, note on the sample submission form that samples were collected by in-line sampling by the operator.
Bulk cheese
Cheese that is manufactured through a continuous process, and for which individual vats cannot be easily separated, will have the entire production run considered as one lot or batch.
Use a sterile cheese trier or knife with a pointed blade when sampling hard or semi-soft cheese in bulk. Use a sterile spatula to sample soft or cream cheeses.
Cheese samples covered with a crust, rind, or in a brine or curd form are sent to the lab as is. The lab will prepare the sample for analysis in its original form so that the analyses will reflect all the edible portions of the cheese.
Ice cream and other frozen dairy desserts
If the container is 2 litres or less, send the whole container for analysis. If the container is larger than 2 litres, using aseptic techniques, scrape off the surface of the frozen dairy dessert with a spoon and collect the sample size specified in the sampling plan. Samples must be kept frozen.
Alkaline phosphatase
The alkaline phosphatase test can be used to verify pasteurization statements and/or product label claims. If the phosphatase test is deemed necessary, it is sampled under the National Microbiological Monitoring Program (NMMP). Inspectors should consult with their supervisor to determine if phosphatase testing is necessary. A positive result indicates that the product does not meet the pasteurization requirements as outlined in section B.08.002.2 of the FDR.
Domestic raw milk for chemical residues
The CFIA has a Memorandum of Understanding (MOU) or agreements with some provinces to monitor chemical residues in raw milk. The province collects samples of raw milk from dairy farms and submits them to CFIA for analysis. It is important that sampling is done throughout the sampling period in order to represent normal conditions throughout the year.
Refer to Raw Milk Samples: Stability of Chemical Residues (accessible only on the Government of Canada network – RDIMS 3553543) and Basic Guidelines for the Collection of Raw Milk Samples (accessible only on the Government of Canada network – RDIMS 3147092) for current guidance from Science Branch.
Vitamin addition
The Operational procedure: Compositional standards verification (under development) contains information for the verification of vitamin addition. Samples may be collected to determine compliance.
Inspect milk products with Vitamin A, C and D additions.
The sample units for analysis should be selected with these considerations:
- Select the most recent production available
- Target any product that would be most adversely affected by the process such as skim milk as it would have the least naturally occurring vitamin A and therefore would give the best indication of the efficiency of the fortification system; for Vitamin D, it is best to take homogenized (whole) milk
Milk can still be analyzed if the sample unit has leaked so long as the leak remains contained in its plastic bag. Wrap individual containers in a double plastic bag. In addition, milk in cardboard cartons should be wrapped in paper towels prior to placing in plastic bags to absorb any condensation.
Appendix 9: Fish and seafood sample collection
In addition to the list of equipment found in the Inspector toolkit (accessible only on the Government of Canada network – RDIMS 11289973) these methods may require:
- sterile knife
- heavy plastic bags (6 mil gauge)
- sterile forceps
- sterile sample container
Refer to Food Sample Collection Plan (accessible only on the Government of Canada network) for additional information on sample assessment criteria.
In addition to the information contained in section 6.2 Conduct the inspection and the techniques provided for aseptic sample collection in Appendix 1, the following is required when samples are collected:
For compositional analysis and chemical indicators, it is important to curtail the bacterial growth and limit autolytic spoilage through temperature control during sample storage and shipping. Keep the frozen product at a temperature below –18°C where possible. Do not leave thawed samples at ambient temperature for a prolonged period of time. The growth of bacteria in the sample may influence the analysis of safety parameters and chemical indicators in the product. For compositional analysis, it is important to prevent the dehydration of the sample.
To mitigate the risk of cross contamination, individual samples must be aseptically sampled and packaged. For histamine analysis, refer to the sampling plan in Appendix 1 of the Operational procedure: Fish grade verification.
Bulk containers
- For fresh or individually frozen whole or dressed finfish or fresh or individually frozen finfish fillets, the individual fish or fillet may be considered as a representative sub-sample
- A 1 kg sub-sample of product obtained from the bulk pack may be considered a representative sample
- When a lot of fresh fish consists of more than one species, all of the sample units used to form a sample shall consist of one species type
Large, whole fish
- Each fish constitutes a sample unit
- A representative sub-sample may be obtained from a large, whole fish, in this case, the sub-sample becomes the sample unit
-
To obtain a representative sub-sample from large, whole fish for chemical and microbiological analysis, take 3 slices of 2.5 cm (one-inch) from each of the following areas:
- behind the pectoral fins
- halfway between the first slice and the vent and
- behind the vent
These 3 slices form the sample unit, representing the large fish
- If the inspector decides only one slice is required as a representative sub-sample from the fish, the one slice should not be taken from behind the vent because this slice does not usually exhibit signs of early decomposition
Sampling of raw shellfish for analysis at a licensed establishment
To avoid cross-contamination, when possible, samples will be collected, packaged and shipped using aseptic techniques (Appendix 1), with minimal exposure of the product, sampling equipment, and the interior of the sampling containers to the environment.
- Collect the minimum of requested animals (this may vary depending on the reason for sampling and the species being sampled)
- Double bag each sample using heavy plastic bags (6 mil gauge) for shellfish collection to ensure that the shells do not puncture the plastic and compromise the sample integrity
- Analysis of shellfish, shucked unfrozen shellfish, and live shellfish must be initiated within 24 hours after collection
- When analysis is unavoidably delayed beyond 24 hours, contact laboratory to determine next steps
- Contact the lab prior to freezing any shellfish sample that has been collected unfrozen
- Aseptically transfer the shellfish to the sample container with sterile forceps
- Final product in cans or containers may also be taken as samples
- Refrigerate (do not freeze) samples of shucked or live shellfish immediately after collection by packing in crushed ice and keeping them in ice until examined
- The shellfish must not come into direct contact with ice
- Care must be taken with these samples to minimize cold shock by insulating these samples from direct contact with refrigerant while still ensuring samples are chilled
- For example, frozen ice packs can be placed below and above the samples with insulating layers of newsprint or other food-quality insulating material placed between the refrigerant and the sample
Appendix 10: Fresh fruit and vegetable sample collection
Refer to the Inspector toolkit (accessible only on the Government of Canada network – RDIMS 11289973) for the list of equipment that this sampling activity may require.
Refer to Food Sample Collection Plan (accessible only on the Government of Canada network) for additional information on sample assessment criteria.
In addition to the information contained in section 6.2 Conduct the inspection and the techniques provided for aseptic sample collection in Appendix 1, the following is required when samples are collected:
Domestic samples
- Samples are collected at the premises of growers, packers, re-packers, wholesalers, exporters who are known to export, or trade fresh produce inter-provincially.
- Samples are not to be sampled from the field, retail, roadside stands, farm gate or farmers' markets.
- Care must be taken to sample directly from the original containers from the storage area only and not from the retail shelves, or from bulk bins.
- Priority should be given to sampling product grown in your own region, province or area when possible.
Imported samples
- Samples are collected at importer establishments.
- Products may be collected from the storage area of large retailers that may or may not be the direct importers or import licence holder, provided that the samples are not collected from the retail portion of the establishment, have not yet been processed for sale at retail and all protocols for sampling at an importer are respected.
- Samples must be taken directly from the original containers from the storage area only and not from retail shelves, or bulk bins. Please note, that if a sample is assessed as non-compliant, follow-up with the importer in accordance with the applicable operational guidance.
- Fresh fruits and vegetables that are grown outside of Canada, but packed domestically (for example, Grown in Mexico, Packed in Canada), should be submitted under the appropriate sample plan code.
Sample selection
- Do not select a product that is rotten or shows any signs of decay (for example, presence of mold or damaged leaves).
- Do not sample a product close to the end of its shelf life. Check the Best Before Date (BBD) prior to sampling, if available. Samples that show signs of mould and other forms of deterioration will be rejected by the laboratory and the product will be required to be re-sampled and resubmitted.
- Sample a product that is pre-packaged, when available. If this is not an option, samples from bulk containers or directly from the end of the packing line may be taken as an alternative.
Sample preparation
- All samples must be kept cool from the time they are collected and shipped frozen or fresh (with cold ice packs) and arrive at the laboratory in good condition.
- Do not freeze the samples. Produce should be protected from direct contact with ice packs to prevent freezing of samples.
Appendix 11: Honey sample collection
In addition to the list of equipment found in the Inspector toolkit (accessible only on the Government of Canada network – RDIMS 11289973) these methods may require:
- sterile long handled ladle
- sterile trier
- sterile spoon and/or knife
Refer to Food Sample Collection Plan (accessible only on the Government of Canada network) for additional information on sample assessment criteria.
In addition to the information contained in section 6.2 Conduct the inspection and the techniques provided for aseptic sample collection in Appendix 1, the following is required for sample collection:
Samples must remain under the appropriate environmental conditions to maintain their integrity, and must arrive at the laboratory within 30 days of collection, otherwise they will be deemed unfit for testing.
Bulk honey
- Wipe the top of the bulk honey barrels / totes / pails before opening. Care should be taken when removing lids and/or plastic liners from bulk honey containers so as not to contaminate the product
- Remove any debris (for example, foam, wax, bee parts) from the immediate sampling
- Sample from below the surface and away from the side of the container to ensure the sampling tool (for example, trier) does not damage the container, and that the sample is representative. Take the sample about 15 cm (6 inches) from the side of the container and approximately 15 cm (6 inches) deep, when possible
- Seal and label each sample unit with the lot code and the sample number
Prepackaged honey
- Ensure that the selected containers are sound and not leaking
- Clearly and permanently mark each sample unit with the lot code and sample
To mitigate the risk of cross contamination, individual samples must be aseptically sampled and packaged.
Appendix 12: Maple sample collection
In addition to the list of equipment found in the Inspector toolkit (accessible only on the Government of Canada network – RDIMS 15525668) these methods may require:
- sterile long handled ladle
Refer to Food Sample Collection Plan (accessible only on the Government of Canada network) for additional information on sample assessment criteria.
In addition to the information contained in section 6.2 Conduct the inspection and the techniques provided for aseptic sample collection in Appendix 1, the following is required for sample collection:
Samples must remain under the appropriate environmental conditions to maintain their integrity, and must arrive at the laboratory within 30 days of collection, otherwise they will be deemed unfit for testing.
Small packages (up to 540 mL or 500 g)
- Take the entire container as a sample
Medium-sized packages (from 1 litre to 40 litres):
- Stir the sampling unit and take the sample portion by pouring into the sampling container
Bulk barrels/totes/pails
- Wipe the top of the container
- Stir the contents with a long-handled ladle to obtain a sample representative of the entire barrel
- Sample from below the surface and away from the side of the container, about 15 cm from the side of the container and approximately 15 cm deep, when possible, to ensure the sampling tool does not damage the container
- Place samples immediately into the sampling container
- Wash the ladle in hot water after each use and dry thoroughly before being used again to prevent mixing syrup from different barrels which may cause cross contamination (for example, flavour, odour, etc.)
Tankers
- Sample from as many different places as possible
- If the product in the tanker is not 100% accessible, take samples in proportion to the number of openings available on the tanker. For example, take 2 samples per opening if there are 3. If there is only one opening, take 3 samples but try to take them from different levels.
Storage tanks used to store syrup waiting to be put in tanker
- Ensure that the tanker filling line does not contain anything that can change the final characteristics of the syrup, then take samples from the storage tanks, and from the tanker after filling
To mitigate the risk of cross contamination, individual samples must be aseptically sampled and packaged.
Appendix 13: Meat and poultry products sample collection
In addition to the list of equipment found in the Inspector toolkit (accessible only on the Government of Canada network – RDIMS 11289973) these methods may require:
- sterile spatula
- sterile sampling spoon
- sterile meat grinder
- sterile, sealable sampling bag
- drill and sterilized auger
Refer to Food Sample Collection Plan (accessible only on the Government of Canada network) for additional information on sample assessment criteria under the specific sample programs (for example the Additives, Adulteration, Allergens, Composition, Irradiation and Nutrition (AAACIN) or National Microbiological Monitoring Program (NMMP).
In addition to the information contained in section 6.2 Conduct the inspection and the techniques provided for aseptic sample collection in Appendix 1, the following is required when samples are collected:
Listeria, Salmonella and E.coli O157:H7 in ready-to-eat meat and poultry products
Licence holders are assigned a Relative risk level (RRL) according to the RTE product risk categories (1, 2A or 2B) and the types of control interventions (sanitation/good manufacturing practices (GMP), antimicrobial agents/ and post-lethality treatment) that they use.
For a licence holder producing RTE products with more than one RRL, the sampling frequency will default to the RRL under which the highest risk RTE product(s) is produced. Where the highest risk RTE product is produced on multiple lines, a production line is selected at random. Therefore, irrespective of the product risk categories and the alternative methods, all establishments must identify their RRL for sampling, verification and compliance purposes.
The sampling of RTE products, under their respective sampling plans, should be evenly distributed throughout the production year. Establishments engaged in seasonal manufacturing of RTE products shall be tested during the production period with the number of samples prorated accordingly.
The random and risk-based sampling plans are targeted towards licence holders who produce RTE meat and poultry products and are designed for swabbing the post-lethality processing environment. Product samples and swabs are directly linked, ensure samples are taken concurrently when required by following the appropriate sampling assessment criteria.
The purpose is to monitor and verify the effectiveness of sanitation and good manufacturing practices in preventing contamination of RTE processing environment and products by Lm or other pathogenic bacteria. Under these plans, the inspector will collect samples only from the sites which are in direct contact with food, that is, with RTE products after they obtained lethality treatment(s).
Refer to Health Canada's Policy on Listeria monocytogenes in ready-to-eat foods (2011) and Control measures for Listeria monocytogenes in ready-to-eat foods for additional information.
E.coli OH147:H7/NM in raw ground beef or veal products
Raw ground beef or veal and precursor materials (PM) intended for use as finished raw ground beef products (FRGBP) and FRGBP are sampled to verify the effectiveness of their control measures for E. coli O157:H7/NM.
Refer to Operational procedure: Control response plan for the detection of E. coli O157:H7/NM in raw beef products and Industry guidance: Preventive controls for E. coli O157/NM in raw beef products for additional information
Species Verification
Species verification is conducted to detect adulteration of raw, RTE and heat treated non-RTE meat products derived from one species with meat products derived from another species.
Nitrates/nitrites
Cured meat products use sodium or potassium nitrite as a preservative, particularly to inhibit the growth of Clostridium botulinum.
Licence holder producing cured meat (emulsified and non-emulsified – for example, bacon, cured fermented sausages, dry cured products, cured hams (canned or cooked), cured meat loaf, pepperoni, or salami) are targeted.
If the laboratory result of the raw product shows a total nitrate/nitrite (sum of the nitrate and nitrite levels) exceeding the maximum level of use set out in Part 1 – Class 1 Preservatives of Health Canada's Lists of permitted food additives – List of permitted preservatives and the Canadian Standards of Identity Volume 7 – Meat products, inspectors should review the company's formulation activities and related controls.
Refer to Industry guidance: Preventive control recommendations on the use of nitrites in the curing of meat products for further guidance.
Protein
Licence holders producing uncooked, solid cut products (such as, seasoned pork chops, roasts, ribs, loins and tenderloins; and uncooked, seasoned, solid cut boneless poultry products such as chicken/turkey breasts) are targeted.
If the laboratory result shows a protein level below the acceptable minimum set out in Sections B.01.090, B.01.091, B.14.021 and B.22.012 of the FDR, inspectors should review the operator's formulation activities and related controls.
Refer to Food Labelling for Industry: Labelling requirements for meat and poultry products and for further guidance:
Mechanically separated meat and finely textured meat
Licence holders producing mechanically separated meat (MSM) and finely textured meat (FTM) are targeted. Analysis is performed for protein, calcium, and bone particle size, to ensure that the product meets the compositional standards set out in Section 1 Interpretation and Table 2, Part A of Canadian Standards of Identity Volume 7 – Meat products.
Central Nervous System Tissue in Raw Mechanically Separated Beef and Finely Textured Beef
Licence holders producing raw mechanically separated beef and finely textured beef produced from bones including the vertebral column are targeted to verify the absence of central nervous system tissue (for example spinal chord material or the dorsal root ganglia) are targeted.
Refer to Guidance on Specified Risk Material for additional information.
Trichinella spiralis in Hogs and Wild Boars
License holders slaughtering market hogs, breeder hogs and wild boars are targeted to verify the product is free from Trichinella spiralis.
Refer to Trichinella for additional information.
Kidney Inhibition Swab Test (KIS)
Licence holders slaughtering red meat species are targeted to verify that antibiotic residues are not present in any animal suspected to have been treated with antibiotics.
Refer to section 6.1.4 Antibiotics of the operational guidance Slaughter floor operations sampling and testing chemical residues and microbes (accessible only on the Government of Canada network – RDIMS 10796096) for additional information.
Appendix 14: Processed egg product sample collection
In addition to the list of equipment found in the Inspector toolkit (accessible only on the Government of Canada network – RDIMS 11289973) these methods may require:
- sterile sample cup
- sterile sampling spoon
- sterile, sealable sampling bag
Refer to Food Sample Collection Plan (accessible only on the Government of Canada network) for additional information on sample assessment criteria.
In addition to the information contained in section 6.2 Conduct the inspection and the techniques provided for aseptic sample collection in Appendix 1, the following is required for sample collection:
Sample liquid or frozen egg products for lab analysis of % total solids.
Important notes:
- If a sample of yolk or whole egg mix is taken for solids, the percent of salt/sugar must be removed from the totals solids in order to get the percent of egg solids. This is done by applying the following formula:
- (% total solids – % added salt/sugar) ÷ 100% – % added salt/sugar = % total egg solids
- If a product fails to meet the standards set out in the regulations for solids/moisture, the lot fails and the product is detained. Averaging with previous lots is not permitted
Liquid product
When sampling liquid product from a production line, the samples must be collected aseptically in a sterile sample cup at appropriate intervals from the draw-off vat as pailing is in progress to spread the sampling over the entire lot. Both liquid products and products intended for freezing may be taken this way.
If the final product container is 250 ml or less, send the whole container for analysis. For consumer prepackaged containers larger than 250 ml, an appropriate subunit can be taken for sample collection purposes. Ensure the subunits represent sampling taken over the entire lot.
Frozen product
Frozen product is sampled as a filled intact entire container, and is usually a unit of < 2 kg.
Sample dried egg products for lab analysis of % moisture.
Dried yellow egg products
Yellow egg products include whole egg, yolk and mixes. Dried yolk and whole egg products are normally sampled throughout a production run.
Sampling during packaging
- Draw the sample from the stream of powder filling the box from the sifter into a sterile sampling bag
- Close the sample bag and store in a sanitary plastic bag
- Repeat sampling at the appropriate intervals until the required number of samples have been collected
Sampling after packaging
- Open the liner, avoiding contact with the inside of the liner
- Unwrap the sterile spoon and place it in the product deep enough so that it will stand on its own
- Open the sample bag
- As the product is being spooned into the bag, the bag should be held off to one side of the open box so that if any product spills it does not fall back into the box. Also, the bag should be open enough so that neither the spoon nor the product touches the edges of the opening
- Once the required amount is drawn, the excess air is expelled from the sample bag by gently squeezing the side together at the top of the bag
- Close the sample bag by holding it by both tabs and whirling it until there is no air space left
- Close the sample liner and draw the next sample
- When sampling is completed, place samples in a sanitary plastic bag pending shipment
Dried albumen
Dried albumen is considered a finished product only after being removed from the heat treatment room after a specified time and temperature as prescribed in licensed operators validated time and temperature procedures.
Select the required number of samples at random as the lot of dried albumen is removed from the heat treatment room or held in storage.
Sampling procedures will be the same as for yellow products sampled after packaging.
Appendix 15: Processed fruit and vegetable products sample collection
Refer to the Inspector toolkit (accessible only on the Government of Canada network – RDIMS 11289973) for the list of equipment that this sampling activity may require.
Refer to Food Sample Collection Plan (accessible only on the Government of Canada network) for additional information on sample assessment criteria.
In addition to the information contained in section 6.2 Conduct the inspection and the techniques provided for aseptic sample collection in Appendix 1, the following is required for sample collection:
To obtain official pH results, send 5 unopened samples to the laboratory for validation of pH,water activity and salt content as per the CFIA sampling information (accessible only on the Government of Canada network).
Appendix 16: Shell egg sample collection
In addition to the list of equipment found in the Inspector toolkit (accessible only on the Government of Canada network – RDIMS 11289973) these methods may require:
- sterile sample cup
- Environmental Sample Collection Toolkit
Definition
- Box
-
means a container made to contain 15 dozen eggs
In addition to the information contained in section 6.2 Conduct the inspection and the techniques provided for aseptic sample collection in Appendix 1, the following is required for sample collection:
- Composition sampling program (cholesterol, fatty acid and vitamin E)
-
Shell eggs that have omega-3, Docosahexaenoic acid (DHA), cholesterol or Vitamin E claims may be sampled to verify compositional claims.
- In order to ensure random sampling, the following procedure should be followed:
- From the lot of eggs to be sampled, select 12 units of eggs at random using the random numbers table (a unit is typically a box)
- Select one carton of eggs from each of the twelve units. Cartons should be selected from different positions in each unit
- Select one egg randomly from each of the 12 cartons. The 12 eggs will constitute one sample
- Break the 12 eggs into a suitable container (plastic or glass sample cups are acceptable). Do not lose any part of the yolk or the white. DO NOT homogenize the sample! Homogenizing in the field can lead to nutrient degradation; the lab will homogenize the sample prior to testing. Seal the sample with CFIA tape. Freeze immediately and ship in the frozen state
- Ensure that the sample submission form includes traceability information (such as, lot code, unique identifier, establishment identification number), the best before date, the correct brand name and any quantitative claims made outside the Nutrition Facts Table (for example, 0.085g DHA per egg). Send a copy of the label to the laboratory with the sample
- Ship the samples with freezer packs using overnight delivery.
- In order to ensure random sampling, the following procedure should be followed:
- Environmental sampling program
-
In addition to the information contained in section 6.2 Conduct the inspection and the techniques provided for environmental sample collection in Appendix 3, the following should also be taken into consideration as required:
Shell eggs, because of their nature and composition, are considered to be potential carriers of Salmonella, particularly if the eggs are subjected to improper handling. The environmental sampling plan is to evaluate the establishment before production (after sanitation, prior to start-up).
The sites listed below in Table 10 are examples only. Sites that are not included may still be sampled. For non-quota holders that are not tested by the Egg Farmers of Canada's flock sampling program, the ungraded area samples should include sites that may detect the presence of Salmonella in the barn (for example, ante-room, ungraded egg packaging).
Table 10. Suggested environmental sampling sites
Graded product contact surfaces
Ungraded product contact surfaces
- washer brushes
- washer rollers
- egg dryer
- crack detector
- scales
- white belt on scales
- towel or belt
- packing head (transfer point)
- packing table
- clam shells
- carton conveyor
- suction cups at packing
- plastic trays
- farm carts
- pre-loader suction cups
- conveyor rollers/belts
- plastic trays
- wood/plastic pallets or dividers
Graded product non-contact surfaces
Ungraded non-contact surfaces
- graded egg cooler floor/door/walls
- graded cooler condensing unit
- carts leaving establishment
- dry storage door
- ungraded cooler floor/door/walls
- buffer/ante room floor/door/walls
- pre-loader frame
- hand wash sink
- Wash water sampling
- The purpose of the wash water sampling program is to verify that the licensed operator has effective preventive control practices to mitigate the food safety risks associated with the handling of shell eggs and the manufacture of processed egg products. Acceptable practices can be found in the Preventive controls for eggs and processed egg products. Refer to Appendix 5 for additional information on water sample collection.
Appendix 17: CFIA payment for food sample collection
Depending on whether a sampling activity falls within or outside CFIA authority, payment for the sample(s) may be required. The following information will help determine whether CFIA payment is or is not required for a sample collection activity.
Sampling activities where payment is not required
Payment is not required for sample collection activities within CFIA authority.
Sampling activity is conducted within CFIA authority:
- designated under the SFCA and/or the FDA
- relating to food safety, consumer protection and trade requirements
- for the purpose of verifying compliance or assessing non-compliance with the SFCA and/or FDA
Examples of sampling activities within CFIA authority include:
- CFIA monitoring sampling program
- preventive control inspection (PCI)
- food safety investigation
- consumer complaint follow-up
When a sample is taken without payment, the inspector may provide the regulated party, upon request, with a receipt using CFIA/ACIA 4168 (accessible only on the Government of Canada network) "Receipt for Sample(s) Taken" (see Figure 1), to document that no payment was made for the sample. If possible, information should be entered in all sections of the receipt. If the information is not available at the time of sampling, enter N/A in the field. Receipt books can be ordered on the Merlin Forms catalogue (accessible only on the Government of Canada network) or printed from the available PDF. See Table 11 for how to fill out form CFIA/ACIA 4168 "Receipt for Sample(s) Taken".
For certain samples taken for food misrepresentation, the dollar ($) value of the sample should be provided. Refer to Operational direction: Food misrepresentation direction (accessible only on the Government of Canada network – RDIMS 13862494), Section 6.1 – Recording inspection information, for more details.
Under certain circumstances (for example, undue hardship) payment for a sample(s) within CFIA authority may be considered. This is determined case-by-case in consultation with the supervisor and/or manager prior to sample collection. In the event of disagreement of payment, the inspector should follow the procedure outlined by the CFIA Complaints and Appeals Office.
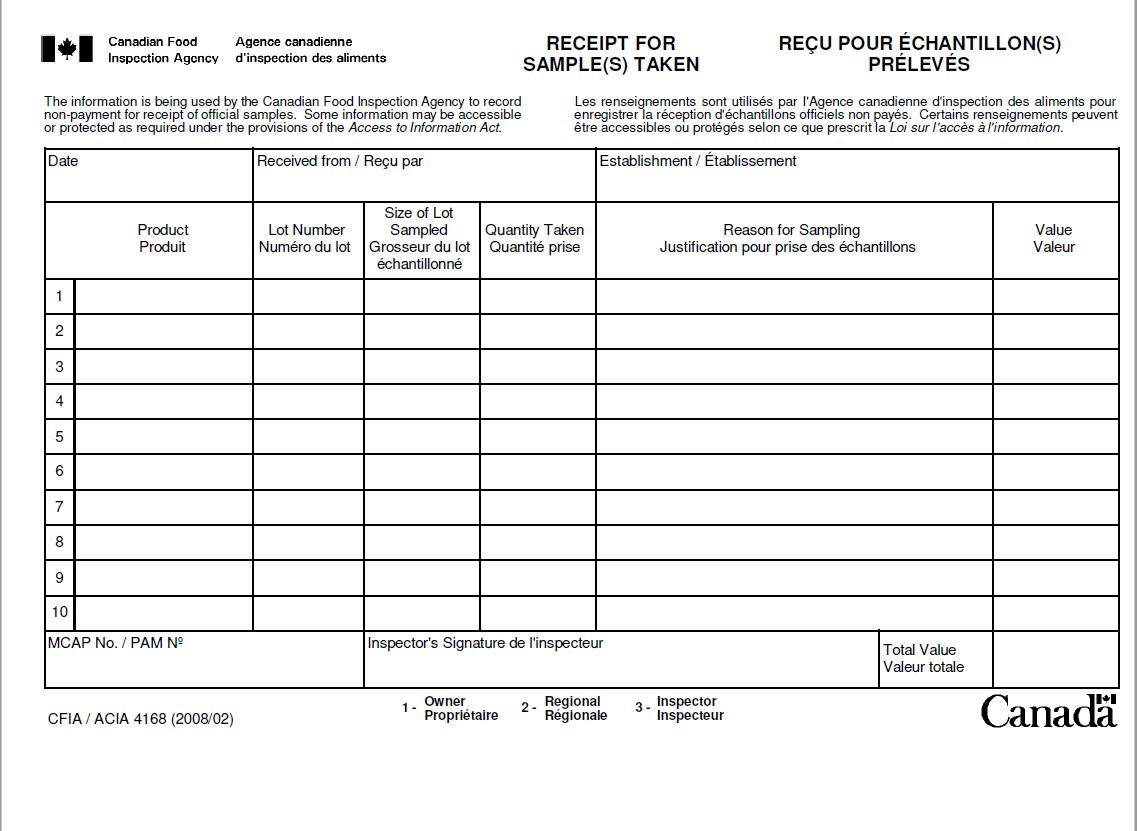
Description for Example of Receipt for Sample(s) Taken
| Name of field | Recommended information to be entered in the field |
|---|---|
| Date | Date the sample is taken |
| Received from | First and last name, and title / position of person to whom the receipt is issued |
| Establishment | Name, address, city, of the facility where the sample is taken. |
| Product | Brand name, common name, size, and variety of the product taken |
| Lot number | Lot number(s) or lot code(s) of the sample |
| Size of the lot sampled | Number of cases or units available for sample selection, usually expressed in (number of cases) x (units per case) x (size per unit) |
| Quantity taken | Number of units and size of package taken (for example, 5 units x 250 g) |
| Reason for sampling | One of the inspection triggers provided in SIP, Section 3.1 – Determine the scope of the inspection. |
| Value | The value of the sample may or may not be available at the time of sampling. If it is available, enter it in the Value field of the receipt. Also indicate if the value entered is a retail or wholesale value. For certain samples taken for food misrepresentation, the dollar ($) value of the sample is required. |
| DSDP / IMS No. | The DSDP, IMS, or other file number associated with the sample. For official samples, the Sample Portion Form CFIA/ACIA 0072. |
| Inspector's signature | Signature and printed name of the inspector |
| Total value | The sum of the value of the all samples for which the receipt is issued |
| Distribution | 1– Owner 2 – Regional 3 – Inspector Provide the original receipt to the regulated party. The copies of the original can be distributed or filed as required. |
Sampling activities where payment is required
Payment is required for samples when they are collected outside the CFIA's authority under the FDA and SFCA.
Examples of sampling activities outside CFIA authority include:
- sampling for Other Government Departments (OGDs) as directed by a sampling plan
- obtaining proof of sale as evidence during an investigation
- calibrating laboratory equipment
- developing laboratory methodology
- obtaining control samples for allergen testing
- Samples collected for Health Canada for the purpose of establishing policies and standards relating to the safety and nutritional quality of food is outside CFIA authority.
When a sample collected requires payment, a Government of Canada (GoC) Acquisition Card (accessible only on the Government of Canada network) should be used. The GoC acquisition card is the primary method of payment within the CFIA.
If the GoC Acquisition Card is not accepted by the regulated party, another method of payment may be used including CFIA (local office) petty cash or out-of-pocket payment (at the inspector's discretion).
Retain proof of payment (for example, a sales receipt) for sample(s) collected.
A "Receipt for Sample(s) Taken" is not issued to the regulated party when an inspector pays for a sample.
Reimbursement
When the method of payment is:
- CFIA (local office) petty cash, submit the receipt to CFIA Accounts Receivable according to established procedures
- Out-of-pocket payment, submit the receipt for reimbursement using Expense Claim (Non Travel Related) (CFIA/ACIN 5734) (accessible only on the Government of Canada network) (found within Merlin Forms Catalogue(accessible only on the Government of Canada network))
Refer to Figure 9: Flow diagram for determining whether or not payment is required for food sample(s).
If unsure whether payment is or is not required, consult with the supervisor (prior to collection).

Description of the flow diagram for determining whether or not payment is required for food samples
The Flow diagram for determining whether or not payment is required for food samples helps inspectors determine when a payment is required during sample collection tasks.
Inspectors must first refer to the written guidance in Appendix 16: CFIA payment for food sample collection to determine if the sampling activity is within CFIA authority.
If a sampling activity is determined to be within CFIA authority, follow the left side of the diagram (green):
- Payment for sample is not required.
- Do circumstances (for example, undue hardship) exist and support CFIA payment for sample?
- if yes, cross over to the right pathway (red)
- if no, continue along the left pathway (green) and the below steps
- Inspector takes the sample(s).
- Inspector may provide the regulated party, upon request, with a "Receipt for Sample(s) Taken".
If a sampling activity is determined to be outside CFIA authority follow, the right side of the diagram (red):
- Payment for sample is required.
- Inspector collects the sample(s).
- Inspector pays for the sample(s) and retains proof of payment.
- Inspector submits receipt for reimbursement, if applicable.
In both cases, the inspector will document all sample collection activity in the appropriate system (for example DSDP, LSTS).