
The following content provides guidance for bovine veterinarians on collecting and packaging samples for BSE testing as part of the BSE surveillance program.
Check the information on the National BSE surveillance program.
On this page
- 1. Sample collection procedures
- 2. Sample preparation and submission
- 3. Prion decontamination procedures
1. Sample collection procedures
1.1 Sanitary precautions
Protect your eyes, nose, mouth and hands from inadvertent direct contact with brain tissue.
1.2 Sample quality considerations
The best sample is the brainstem with a clearly visible obex.
Avoid:
- autolysis (rotting) of brain tissue
- multiple freeze-thaw cycles or prolonged refrigeration
- rough handling during sampling and shipping
- sampling without the obex
- taking the sample in multiple pieces
Best practices:
- collect samples fresh and keep refrigerated for a short period
- ship promptly to BSE lab on ice packs
- avoid freezing the brainstem; if a delay is expected, freeze at -20°C or lower
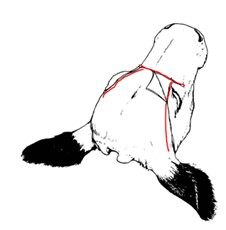
1.3 Disarticulation of the head
Only proper disarticulation of the head at the atlanto-occipital joint to expose the foramen magnum will allow proper collection of the brainstem containing the obex. If disarticulation happens at another joint, it will make it very difficult to access the obex without damaging it.
1.4 Identification of the obex
These images illustrate the portion of the brainstem to be collected using any of the techniques outlined in section 1.5, ensuring it includes the obex.


1.5 Sample collection techniques
1.5.1 Spoon technique
To perform this technique, the following are needed:
- rat-toothed forceps
- pair of mayo dissecting scissors
- obex removal spoon
- primary receptacle
- paper towels
- indelible marker
- Label the primary receptacle with the unique identifier (UID) using an indelible marker and leave aside
- Using a post-mortem knife, disarticulate the head from the carcass at the atlanto‑occipital joint and sever the spinal cord transversely
- Place the disarticulated head on the table, dorsal side down, with the foramen magnum facing you
- Using the forceps and scissors, make a single cut down the centre of the exposed dura mater, thereby creating 2 flaps
- Hold the dura mater with the forceps to expose the cranial nerves exiting the spinal cord
- Sever the cranial nerves from the spinal cord (this is the most important step in freeing the spinal cord and facilitating the spoon technique removal of the obex)
- Insert the spoon face down through the foramen magnum
- Move the spoon forward to lodge the tip of it between the cerebellum and the brainstem/spinal cord
- Apply downward pressure on the spoon while moving it from side-to-side over the spinal cord to sever the spinal cord from the rest of the brain
- Use the spoon to gently pull the severed brainstem/spinal cord through the foramen magnum
- Place the brainstem in the primary receptacle for submission for testing
- If needed, clean the outside of the primary receptacle without damaging the label
- Follow adequate decontamination measures
1.5.2 Spatula technique
To perform this technique, the following are needed:
- post-mortem knife
- rat-toothed forceps
- pair of mayo dissecting scissors
- brain knife
- spatula
- primary receptacle
- paper towels
- indelible marker
- Label the primary receptacle with the UID using an indelible marker and leave aside
- Using a post-mortem knife, disarticulate the head from the carcass at the atlanto‑occipital joint and sever the spinal cord transversely
- Place the disarticulated head on the table, dorsal side down, with the foramen magnum facing you
- Using forceps and scissors, remove the dura mater through the foramen magnum opening to expose the medulla
- Insert a brain knife rostrally into the cranial cavity through the foramen magnum
- Ensure the knife blade is parallel to the dorsal surface of the brainstem and ventral to the cerebellum, then move the knife in a side-to-side slicing motion until the tip contacts bone
- Rotate the knife blade and carefully push aside the cerebellum
- Remove the knife
- Ensuring that that the spatula blade is facing laterally, insert the spatula through the foramen magnum
- Push the blade rostrally until the shaft of the spatula is approximately 2 thirds into the cranial cavity (this will correspond to the level to the pontomesencephalic junction)
- Rotate the blade ventrally and dorsally, severing the brainstem
- Grasp the caudal end of the brainstem with rat-toothed forceps
- Gently pull the spatula and the forceps caudally to cause the removal of the brainstem
- Place the brainstem in the primary receptacle for submission for testing
- If needed, clean the outside of the primary receptacle without damaging the label
- Follow adequate decontamination measures
1.5.3 Whole brain removal technique
When the obex cannot be submitted for testing, submission of the whole brain is a recommended alternative.
Removal of the entire brain requires the following:
- post-mortem knife
- post-mortem saw
- chisel
- scissors
- primary receptacle
- paper towels
- indelible marker
Note: do not use an axe to open the cranium.
- Label the primary receptacle with the UID using an indelible marker and leave aside
- Using a post-mortem knife, disarticulate the head from the carcass at the atlanto‑occipital joint and sever the spinal cord transversely
- Place the disarticulated head on the table. The head should be placed dorsal side up
- Incise the skin across the frontal area so as to be able to skin the area where incisions with the saw will be made (see figure 3)
- Remove circumscribed skin and ears from the bones of the skull
- With a knife, roughly mark 3 lines to demarcate the piece of the skull that will need to be removed by sawing along the lines (see figure 4)
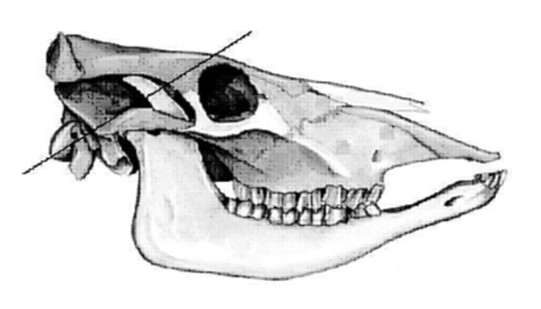
- Using a post-mortem saw, make a cut from 1 supraorbital foramen to the other (see figure 5), about 2 cm deep and slanted in a caudal direction
- Make 2 other cuts on each side of the cranium from the middle of the foramen magnum, parallel to its lateral borders, to a point 2 cm medial to the orbital rim, angled about 45 degrees inward (see figure 6)
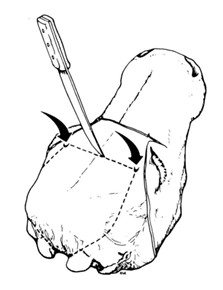
- Insert a heavy knife or chisel into the first cut and pry the top of the skull caudally
Take care to prevent the attached meninges from disrupting the brain substance, especially the meninges between the cerebral hemispheres and anterior to the cerebellum; scissors are more suitable than a knife to cut these membranes. - Cut the olfactory tract and raise the brain slightly upward so the optic nerve can be cut
As the brain is raised, the pituitary stalk comes into view. Cut the stalk, leaving the pituitary gland in its bony fossa. - Gently raise the brain upward and backward, then cut the cranial nerve roots
This allows the brain, along with an approximately 4 cm segment of cervical spinal cord, to be freed from the cranial cavity. - Place the brain in the primary receptacle for submission for testing
- If needed, clean the outside of the primary receptacle without damaging the label
- Follow adequate decontamination measures

2. Sample preparation and submission
A checklist with all steps from preparation to packaging and shipping the sample can be found in section 2.4.
2.1 Sample preparation and packaging
The required samples must be submitted fresh (whenever possible). Freezing of the sample (at -20°C or lower) should only be used if a delay of several days is anticipated between sample collection and arrival at the BSE laboratory.
It is key that all samples submitted are accompanied by the UID generated by the online questionnaire for BSE surveillance candidates. A sample without a UID will not be processed at the laboratory.
The UID consists of random lowercase letters and numbers. For example: 0jm2bjtivl, where the first character is the number 0, and the last one is the lowercase letter "l" (as in "lion").
2.2 Sample packaging
Correct packaging is vital to protect the specimens, as well as those who handle the packages.
-
Primary receptacle: this is the container that holds the target tissue
It should be a leak proof container such as a Whirl-Pak® sample bag or a hard plastic container with a tight-fitting lidThe primary receptacle must have the UID permanently marked on the container using an indelible marker.
-
Secondary container: this is the container that holds 1 or more primary receptacles
The secondary container should also be leak proof and contain absorbent material capable of absorbing the liquid contents of the primary receptacle, as well as a frozen ice pack to keep the sample chilled during transit.The secondary container must have the UID permanently marked on the container using an indelible marker.
- Outer packaging: the outer package holds the secondary container and must contain the following markings:
- the name, address and contact telephone number of both the shipper and the consignee
- the words "The UID is"
- the words "Exempt Animal Specimen"
- the words "Emergency 24-hour number: 613-239-4604"
2.3 Sample shipping
A statement indicating that this sample is an Exempt Animal Specimen should be added to the shipper's waybill.
All samples for BSE testing should be sent to the nearest laboratory participating in testing for BSE.
2.4 Checklist to prepare, package and ship samples for BSE testing
- The carcass or portion of carcass is accompanied by a UID
(if not, do not collect or ship the sample) - The target tissue (obex) is within the sample to be submitted
- The sample is not autolyzed
- The sample is packaged in a leak proof primary receptacle
- The primary receptacle is identified by the UID in a permanent manner
- The primary receptacle is within a secondary container
- The secondary container has the primary receptacle(s), absorbent material (for example paper towel) and frozen ice pack(s)
- The outer packaging has all needed markings:
- the name, address and contact telephone number of both the shipper and the consignee
- the words "The UID is "
- the words "Except Animal Specimen"
- the words "Emergency 24-hour number: 613-239-4604"
- The shipper's waybill states that this is an Exempt Animal Specimen
- The sample is shipped to the nearest laboratory participating in testing for BSE, or 1 of our district office is contacted to arrange for pick-up
3. Prion decontamination procedures
Use sodium hypochlorite (NaOCl) or sodium hydroxide (NaOH) for prion decontamination of equipment/instruments and work surfaces as follows:
- Sodium hypochlorite (NaOCl) at a concentration of 2% available chlorine
This can be prepared from industrial grade or commercially available bleach (such as Javex). Dilute the bleach to provide a final concentration of 2% (20,000 ppm) available chlorine. For example, most commercially available bleaches have 6% available chlorine listed on the label. In this case, mix 1 part bleach and 2 parts water (ratio 1:2) to attain the 2% concentration of available chlorine. - Sodium hydroxide (NaOH) at a concentration of 2 molars
The product can be purchased from Fisher Scientific in crystal form. To make a 2-molar concentration of NaOH, dilute 80 grams NaOH crystals in 1 litre of water and stir well.
Surfaces and equipment should be left wet (or soaking) with NaOCl or NaOH for at least 1 hour at 20°C.
Note: other disinfectants such as Virkon are not effective against BSE prions.
Instruments intended for disposal
Instruments intended for disposal may include items such as disposable scalpels. Before disposal:
- incinerate at 850°C; or
- wipe clean, soak in either NaOCl at 2% available chlorine or in NaOH at 2 molars for 1 hour at 20°C, and then discard as domestic waste; or
- wipe clean, autoclave at 134°C for 1 hour, and then discard as domestic waste
Paper towels used to wipe instruments clean are treated as solid waste.
Instruments intended for re-use
Instruments and materials subject to re-use should be kept moist between the time of exposure to infectious materials and subsequent decontamination.
- For reusable instruments that are not heat-sensitive:
- wipe clean and autoclave at 134°C for 1 hour; or
- wipe clean, soak in either NaOCl at 2% available chlorine or in NaOH at 2 molars for 1 hour, rinse with water, transfer to water and autoclave at 121°C for 1 hour
- For heat-sensitive reusable instruments:
- wipe clean, soak in NaOH at 2 molars for 1 hour at 20°C and rinse with water
Surfaces
Clean thoroughly, flood surfaces with either NaOCl at 2% available chlorine or NaOH at 2 molars for 1 hour at 20°C and rinse with water to prevent potential damage due to the caustic nature of NaOCl and NaOH.
Solid waste (disposable personal protective equipment, garbage, etc.)
- Incinerate at 850°C; or
- Autoclave at 134°C for 1 hour; or
- Alkaline hydrolyse using a pressurized vessel at 150°C
Once decontamination is complete, discard as domestic waste.
Liquid waste
- Incinerate at 850°C; or
- Autoclave at 134°C for 1 hour; or
- Mix with bleach for a final concentration of 2% available chlorine for 1 hour
Once decontamination is complete, discard as domestic waste.