
Chapter 7 - Scrapie Flock Certification Program
7.5 Appendices
This page is part of the Guidance Document Repository (GDR).
Looking for related documents?
Search for related documents in the Guidance Document Repository
Appendix A: brain sampling procedures
Entire heads may be submitted fresh or frozen to an approved laboratory.
Scrapie is not considered to be a human pathogen; however, normal sanitary precautions against a possible range of pathogens should be taken. Wear protective clothing, gloves and face protection when collecting brain specimens. Always avoid direct contact with brain tissues. Personnel at tissue harvesting sites should take precautions to avoid ingestion of the agent.
Precautions against the transmission of disease to small ruminants and the environment are warranted. It is recommended that the animal's head be placed on a disposable plastic drop sheet. The sheet should be large enough to cover the work area. As prions are particularly resistant to standard physical and chemical methods of decontamination, see Appendix E for appropriate disinfectants.
obex harvesting technique
Recommended tools:
- autopsy knife for disarticulation of the head (if required);
- obex removal spoon or knife; and
- rat tooth forceps.
Additional tools that you may choose to use:
- scalpel; and
- scissors.
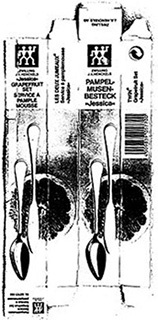
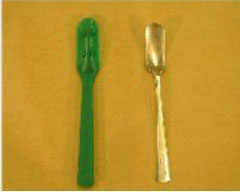
The obex removal spoon or knife may be fashioned from the Zwilling J.A. Henckels – Jessica Grapefruit spoon or knife, respectively. Alternatively, any butter knife or suitably long and concave spoon (6 mm concavity) can be modified. The edges of the knife must be sharpened. The edges of the spoon should be cut down to measure 22-26 mm at the widest point and sharpened to a blade.

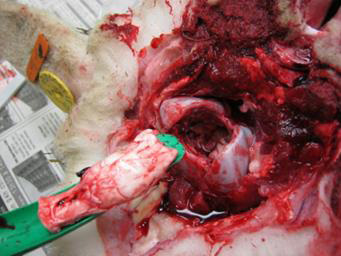
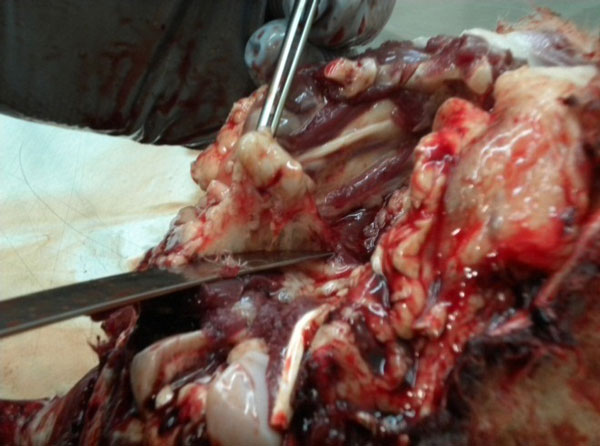
With the aid of an autopsy knife, disarticulate the head at the level of the atlanto-occipital articulation. Place the head dorsal side down on a table with the foramen magnum (the opening of the spinal canal) facing you.
Using the forceps with your left hand, grasp the dura mater (the thick lining around the spinal cord) and with the scissors in your right hand, make a single cut down the centre line to form two flaps. (This step is not mandatory.) Remove the congealed blood from around the cord.
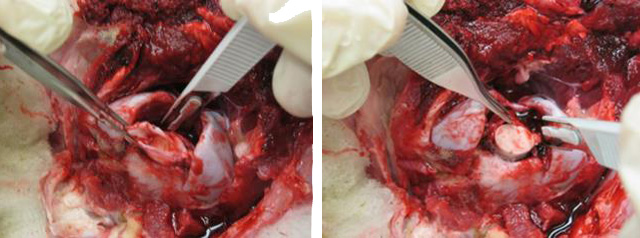
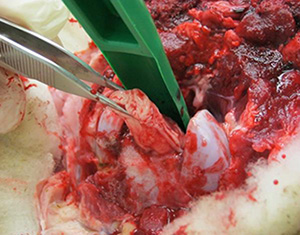
With the forceps in your left hand holding the dura, sever the cranial nerves from the cord. This can be done with scissors or with the obex spoon/knife by passing the spoon/knife around the cord, keeping the flat side of the spoon/knife against the cord. (See next picture for position of obex spoon/knife in relation to the cord.) This is the most important step in freeing up the cord. The cord must be completely free from attachments (by cranial nerves) in all directions. If you do not sufficiently free up the cord, you will not be able to sample anteriorly enough to get the obex, or one side will be missing.
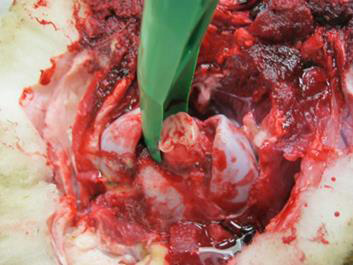
Insert the obex spoon/knife face down into the vertebral canal and move it forward, lodging the tip as far cranially as it will go. This should position the tip of the spoon/knife over the part of the cord just anterior to the obex and just behind the cerebellar attachments.

Brain Sampling Procedures - Figure 6
This image represents the cranial nerves. Listing the cranial nerves and other key brain structures from top to bottom: Optic chiasm, Trochlear nerve, Abducens nerve, Vestibulocochler nerve, Vagus nerve, Choroid plexus, Accessory nerve. The sampled portion of cord showing cranial nerves is identified with a rectangle.
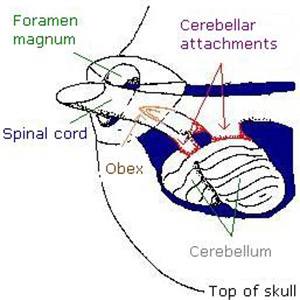
Brain Sampling Procedures - Figure 8
This image is the diagram of vertebral canal and cerebellar attachments. Listing the parts of the vertebral canal and cerebellum from top left to bottom right: the Foramen magnum, Spinal cord, Obex, Cerebellar attachments, Cerebellum, Top of the skull.
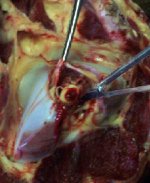
Pick up the head and (if right-handed) hold in left hand, dorsal side down. While pushing down with your index finger, manoeuvre the tip of the obex spoon/knife back and forth over the cord to sever it from the rest of the brain just rostral to the obex and caudal to the cerebellar attachments. Rotate the skull with your other hand in the opposite direction of the spoon/knife to facilitate the cutting of the cord.
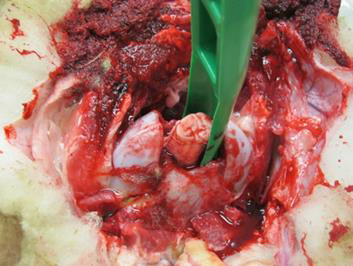
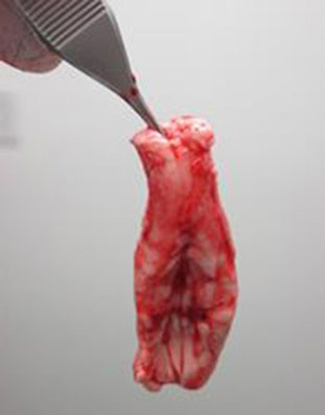
Use the obex spoon/knife to gently pull the severed portion of the brain from the canal. The obex is recognizable as a V-shaped depression. This portion is the single most important site for diagnostic testing.


Submission and packaging
Contact the CFIA-approved laboratory to which you will be submitting the samples and request information on preparing the sample for submission (fresh or frozen).
Samples can be frozen and batch-shipped in a frozen state to a CFIA-approved laboratory for enzyme-linked immunosorbent assay (ELISA) testing (if necessary).
As traceability is critical when there is a scrapie positive, it is essential to ensure that the sample submitted is irrefutably linked to the correct animal by documenting national identifiers or other unique identifiers. Submit physical identification device(s) with 1 cm of adjacent tissue. The adjacent tissue will allow DNA verification if required.
Tissues for scrapie surveillance testing may be packaged and shipped as exempt animal specimens in accordance with the Transportation of Dangerous Goods Regulations. The basic four-part packaging system may be used: The specimen must be packaged in a primary watertight receptacle (such as a small sealable plastic bag) with labelling. Enclose this in a second durable watertight packaging with adequate absorbent material to absorb all fluid in case of breakage. Outer packaging, such as a fibreboard box, protects the contents from external physical damage. The description of the contents on the shipper's waybill should include the notation "exempt animal specimen."
Appendix B: collection of retropharyngeal lymph nodes

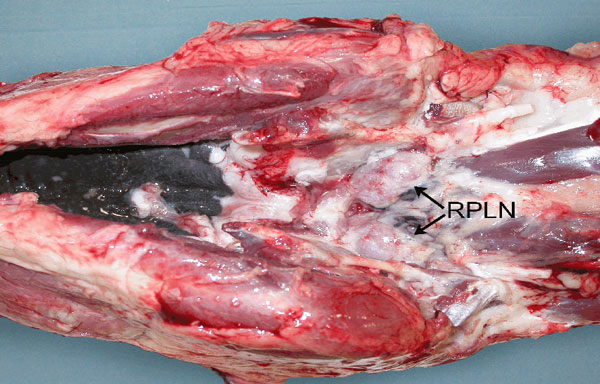
Lymph nodes are submitted along with the brain (obex) when samples are taken as part of the SFCP. The medial retropharyngeal lymph nodes (RPLNs) are usually chosen, though any other head or neck lymph node is acceptable. The medial RPLNs are medial to the stylohyoid bones on the dorsolateral surface of the pharyngeal muscles and dorsal to the carotid artery. They are medial and deep, and rarely removed by normal dressing procedures.
Recommended tools:
- Sharp boning knife
- Scalpel
- Sharp stainless steel scissors
- Rat-toothed forceps
Procedure:
- Place the head dorsal side down on the table. Remove the skin from the ventral side of the mandible.
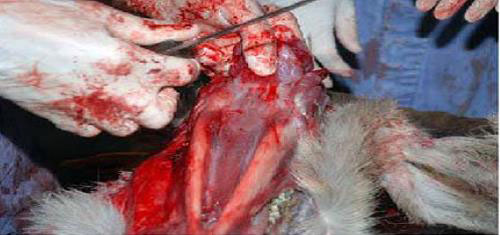
- Grab the pharynx with the non-cutting hand and pull it toward you. Place the knife on the mandibular symphysis, and cut caudally with the blade touching the ventral aspect of the mandible. As you cut caudally, follow the angle of the mandible dorsally, as you approach the rami of the mandible.
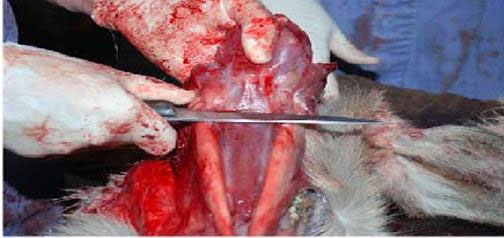
- Cut the hyoid bones, or disarticulate them at a joint.
- The medial RPLNs are caudal to the nasopharynx. Place your index finger in the nasopharynx and the thumb caudally on the caudal pharyngeal muscles. When the thumb and index finger are brought together, the medial RPLNs can be palpated between them. The opposite node will be about 1 centimetre medial to the first. Dissect medial RPLNs from the surrounding pharyngeal muscles with rat-toothed forceps and scissors, scalpel, or knife
(Above figures are from the USDA sampling guide.) Alternative approach
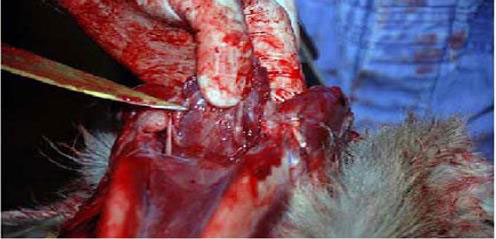
- An alternative approach is the caudal approach. Place the head upside down (dorsal side down), with the nose pointing away from sampler, and with the foramen magnum facing sampler. The medial RPLNs lie deep and between the base of the larynx (windpipe) and the floor of the skull. They are "buried" in an area of whitish connective tissue on either side of the pharynx and upper neck and jaw.
- To access the buried RPLNs, with a knife, make the first incision, going straight upwards, from just above the foramen magnum to the surface. Make a second cut, extending from where the first cut began, staying close to the base of the skull and moving the knife down and to the right as if you were boning out the tissue. Make the third cut, starting at the same spot above the foramen magnum and going down and to the left, staying close to the skull.
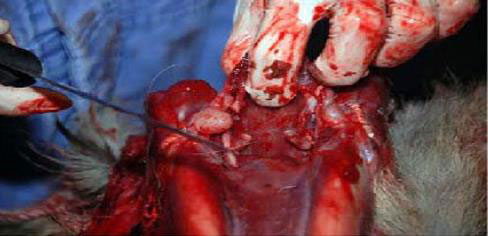
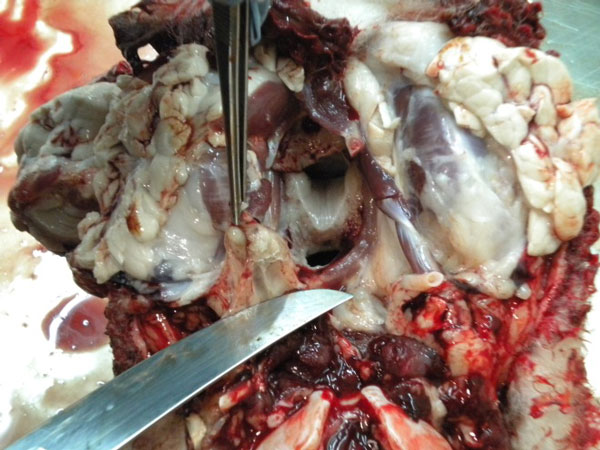
- After pulling back/reflecting the two flaps created, notice an area of white connective tissue and fat on either side of the cut. The RPLNs are encapsulated in the white fibrous tissue.
Bluntly dissect out the beige-coloured, firm nodular lymph nodes buried in the white connective tissue.
Once RPLN samples are collected
- Place the collected RPLNs into a plastic bag for chilling or freezing.
- For submission instructions refer to submission and packaging for brain samples in Appendix A.
Appendix C: sampling procedures for genotyping
Samples required for genotyping may be taken by a veterinarian accredited to deliver the VSFCP or a third party under the supervision of a veterinarian accredited to deliver the VSFCP (for example a veterinary student, a technician). Approved identifiers are required on sheep being genotyped and the official identification number (15 digits) included with the sample submission
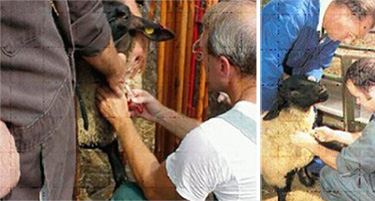
Jugular venipuncture
To facilitate the rapid collection of blood samples from multiple sheep in as little time as possible, it is suggested to not waste time upending the sheep. Restrain sheep for venipuncture in a standing position.
Occlude thoracic inlet, palpate or approximate the location of the jugular vein, and insert Vacutainer needle.
A single-use needle is required for each animal, to prevent cross-contamination of DNA.
Collect a full 7-10 ml of blood in an ethylenediaminetetraacetate (EDTA) tube (lilac or purple top).
Make sure that the sample and individual animal identification are irrefutably connected.
Samples should be stored at 4°C until shipped. Ship to laboratory as soon as possible.
Check with individual laboratories for preferences regarding sample submission, including preferred day of submission.
Tissue samples for genotyping
Other tissues such as brain and hair can be used. Check with individual laboratories for preferences regarding tissue selection. If the head or brain sample is being forwarded for scrapie testing, it would be easiest for the laboratory to forward a sample of brain for genotyping.
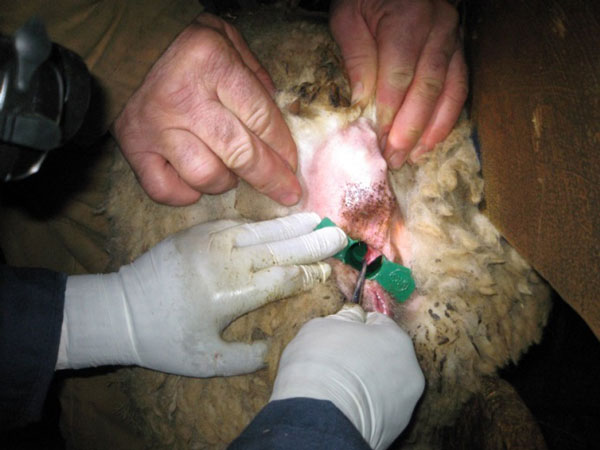
Appendix D: RAMALT biopsy sampling procedures
The recto-anal mucosal-associated lymphoid tissue (RAMALT) biopsy procedure is performed on sheep and goats and is a live animal screening test. Another live animal screening test is the third eyelid lymphoid follicle sampling procedure used in sheep but is more difficult and less commonly used.
As potentially infective lymphoid tissue is being harvested, and as the site of harvesting (recto-anal tissue) is theoretically a possible route of introduction of the scrapie agent, precautions to prevent potential transmission of scrapie are required in sampling potential source flocks.
Instruments can be handled in one of the following ways:
- Single-use instruments may be used and discarded after use on a single animal.
- Multi-use instruments may be disinfected with a product and protocol known to be effective against prions (See Appendix E for disinfectants).
- Alternatively, the forceps and scissors used on an individual animal may be placed in a bag accompanied by the individual animal's identification. These instruments may then be stored until the results of the tests are known. Disinfect instruments used on scrapie-negative sheep and return to normal use. Disinfect instruments used on scrapie-positive sheep and then dispose of them.
Technique
One person is required to restrain the animal by holding it against a wall or in a corner.
Verify the individual identification of the animal. For sheep, also verify by checking individual identification that this animal has been genotyped as a 171QQ.
Anesthetic/analgesic cream (lidocaine and prilocaine) is not required but if preferred can be applied to the distal rectal mucosa with a gloved finger. An example would be Eutectic Mixture of Local Anesthetics (EMLA), a 1:1 oil/water emulsion of a eutectic mixture of lidocaine and prilocaine based cream, produced by Astrazeneca Canada Inc. Lidocaine and prilocaine, both solids at room temperature, form a eutectic that is an oil with a 16°C melting point.
If using a rectal speculum, insert into rectum after liberal application of analgesic cream, which also doubles as a lubricant.
Allow approximately five minutes for the analgesic/anaesthetic cream to take effect.

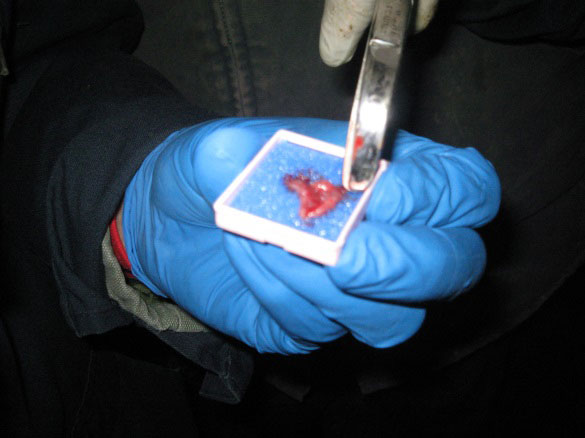
Palpate/visualize the recto-anal junction. Take samples approx 1-2 cm anterior (aboral) to the recto-anal junction. Preferred locations for sampling include the dorsolateral (10 and 2 o'clock positions) and ventrolateral (4 and 8 o'clock positions) surfaces of the mucosa. Take samples at 10, 2 and, if necessary, 4 and 8 o'clock positions. Avoid sampling the roof or the floor of the mucosa (the 6 and 12 o'clock positions). Using forceps, pick up the rectal mucosa/crypt, creating a "tent" of tissue. Using scissors, excise the tent of tissue.
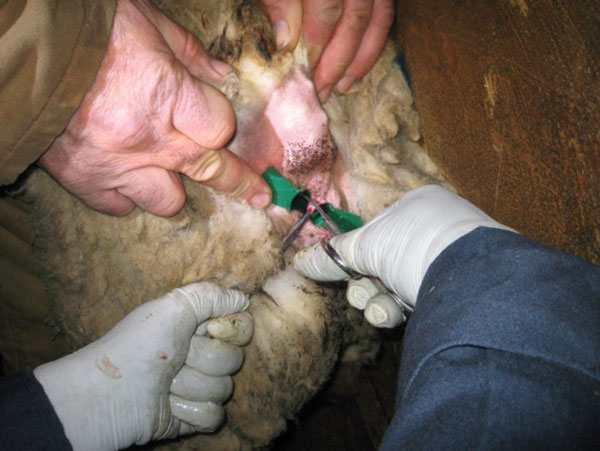
Place the biopsy samples in a labelled cassette lined with a biopsy pad (for example Leica Microsystems – 1 x 1.25 Cat # 3801000).
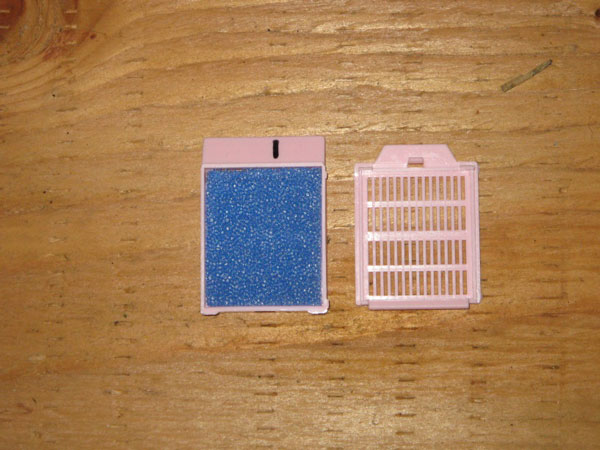
Place the cassette(s) in a leak-proof container with 10% neutral buffered formalin for the fixation period (see notes below), at a ratio of 1:10 tissue/formalin, prior to shipping. Send the sample(s) to an approved laboratory for RAMALT biopsy testing using immunohistochemistry.
Notes:
- When submitting formalinized RAMALT biopsy tissues, the specimen(s) must be fixed for at least 24 hours and for no more than five days, depending on the size of the sample. Penetration of formalin is at least 5 mm of tissue thickness per day and should be in a 1:10 (Tissue: Formalin) ratio. Samples must be sent to the CFIA district office within 2 days of fixation.
- Cassettes should never be labelled with a permanent marker, as this will likely smudge and will disappear during the processing time. An HB #2 pencil (or a histological marker which is alcohol safe) is most appropriate when labelling cassettes.
- Containers that are adequate for the fixation period should be clean with no debris, leak-proof, sealable, and allow easy access to cassettes. Approximately 20 cassettes can be placed in a 500 mL container and 30 in a 750 mL container to achieve an adequate tissue-to-formalin ratio. (for example Starplex Scientific® in Etobicoke, Ontario, sells histology containers that encompass the necessary parameters of specimen fixation containers).
Appendix E: sanitary precautions/disinfectants
Scrapie is not considered to be a human pathogen; however, when sampling, normal sanitary precautions against a possible range of pathogens should be taken. Wear protective clothing, gloves and face protection when collecting brain and lymph node specimens. Always avoid direct contact with brain and lymphoid tissues. Personnel at tissue harvesting sites should take precautions to avoid ingestion of the agent.
Prion agents are particularly resistant to standard physical and chemical methods of decontamination. Traditional disinfectants such as Virkon are not effective against prion agents. Instruments and surfaces must be disinfected with either sodium hypochlorite or sodium hydroxide, recommended protocols include the following:
It is recommended that the animal's head be placed on a disposable plastic drop sheet. The sheet should be large enough to cover the work area. Used disposable protective clothing, gloves, and animal remains should be buried or incinerated.
Instruments
Instruments and materials subject to re-use should be kept moist between the time of exposure to infectious materials and subsequent cleaning and decontamination.
- For heat-sensitive instruments: Wipe clean thoroughly, and then soak in 2% available chlorine or 2N NaOH for a contact time of 1 hour at 20°C;
- For instruments that are not heat sensitive: Wipe clean thoroughly, autoclave at 134°C for 1 hour or wipe clean thoroughly, soak in 1N NaOH or 2% available chlorine for 1 hour, rinse with water, and autoclave at 121°C for 1 hour.
Surfaces:
- Clean thoroughly, flood surfaces with 2% available chlorine for 1 hour at 20°C, and then rinse with water; or
- Clean thoroughly, flood surfaces with 2N NaOH for 1 hour at 20°C, and then rinse with water.
Chemicals
- Sodium hydroxide (NaOH) can be purchased in crystal form (for example from Fisher Scientific). To make a 2 Molar concentration of NaOH, dilute 80 grams NaOH crystals in one litre of water and stir well.
- Sodium hypochlorite (NaOCl) can be prepared from industrial grade or commercially available bleach (such as Javex). Dilute the bleach to provide a final concentration of 2% (20,000 ppm) available chlorine. For example, most commercially available bleaches have 6% available chlorine listed on the label. In this case, mix one part bleach and two parts water (ratio 1:2) to attain the 2% concentration of available chlorine.
Appendix F: cleaning and disinfection on a premises
Cleaning and Disinfection (C&D) on a premises is applicable in certain situations when a SFCP flock/herd with status D or higher is moving to a new premises and wishes to keep that status. If C&D is required, owners who do not undertake C&D and have it approved will not be permitted to keep their flock status. Details are provided in the SFCP National Standards Section 2.
If C&D is required on the premises it must be supervised by the accredited veterinarian and follow an approved cleaning disinfection protocol as follows:
- C&D applies to structures where small ruminants are identified to have been contained (indoors or outdoors) or lambed/kidded.
- Bury or compost bedding, manure, and waste material from these lambing/kidding/housing areas. If composting is chosen, the material is composted for six months and then disposed of on land to which sheep and goats do not have access.
- Scrape off surface soil (1-2 inches below the depth to which the surface is broken up) from areas identified as outdoor lambing/kidding or housing areas, and bury or dispose of the soil on land to which sheep and goats do not have access.
- Remove organic debris from, and then superficially disinfect concrete, metal, and wooden structures, including water troughs and drinking bowls, identified to have been in contact with small ruminants. To disinfect use sodium hypochlorite solution (NaOCl) or sodium hydroxide (NaOH) as described in Appendix E.
- It is suggested that the accredited flock/herd veterinarian approve the cleaning before proceeding with the disinfection. This course of action permits the cleaning to be repeated, if it proves inadequate, without having to repeat the more difficult disinfection step.
Appendix G: list of laboratories
CFIA-approved laboratories for scrapie genotyping
Animal Health Laboratory
Laboratory Services Division
University of Guelph
419 Gordon Street, Building 89
P.O. Box 3612
Guelph, Ontario, N1H 6R8
Telephone: 519-824-4120, ext. 54530
Facsimile: 519-827-0961
USDA Laboratories - PDF (7 kb)
Laboratories approved by the United States Department of Agriculture (USDA) for scrapie genotyping are acceptable to the CFIA Terrestrial Animal Health Division for export and flock certification testing. The current list of USDA-approved labs for scrapie genotyping can be found on the USDA Animal and Plant Health Inspection Service website under Approved Genotyping Laboratories.
CFIA-approved laboratories for scrapie testing using the BioRad ELISA
Alberta Agriculture and Forestry
Agri-Food Laboratories Branch
TSE Laboratory
6909 - 116th Street
Edmonton, Alberta, T6H 4P2
Telephone: 780-422-4830
Facsimile: 780-415-4527
Animal Health Laboratory
Laboratory Services Division
University of Guelph
419 Gordon Street, Building 89
P.O. Box 3612
Guelph, Ontario, N1H 6R8
Telephone: 519-824-4120, ext. 54530
Facsimile: 519-827-0961
Prairie Diagnostic Services Inc.
52 Campus Drive
Saskatoon, Saskatchewan, S7N 5B4
Telephone: 306-966-7316
Ministère de l'Agriculture des Pêcheries et de l'Alimentation du Québec (MAPAQ) (French only)
Laboratoire d'épidémiosurveillance animale du Québec *
3220 Sicotte Street
Saint-Hyacinthe, Quebec, J2S 7X9
Telephone: 450-778-6542
Facsimile: 450-778-6535
* Currently only receiving samples from laboratory necropsy, not on farm deadstock.
Note: Samples may also be submitted through a CFIA district office to CFIA laboratories in Ottawa (Fallowfield), Lethbridge, or Saint-Hyacinthe as part of the National Scrapie Surveillance Program.
CFIA-approved laboratories for RAMALT biopsy testing using immunohistochemistry
The CFIA Ottawa Laboratory (Fallowfield) is currently the only laboratory conducting the immunohistochemistry (IHC) test. Samples must be submitted through a CFIA district office to the CFIA laboratory in Ottawa (Fallowfield). Samples must be sent to the district office within 2 days of fixation. Contact your district office to plan the shipment and for more information.
- Date modified: