
If you need to exit My CFIA, select "Save and return later" to continue with your application another time.
Steps
- 1. Log in
- 2. Create a new service request
- 3. Select your application type
- 4. Provide an application name and date of export
- 5. Select a business line, commodity group, end use and destination country
- 6. Identify transit countries
- 7. Select commodity sub-group, commodity type and product type
- 8. Identify the consignor
- 9. Identify the consignee
- 10. Add or remove rows in the export certificate product table
- 11. Verify the eligibility of shipment for export
- 12. Add a manufacturer
- 13. Upload supporting documents (if applicable)
- 14. Add the location and date of inspection (if applicable)
- 15. Modify transportation information
- 16. Add additional export product information
- 17. Enter attestation information details (if applicable)
- 18. Export certificate information and attestation
- 19. Identify a CFIA service location (if applicable)
- 20. Select the invoice recipient (if applicable)
- 21. Submit your application
1. Log in
Sign into your My CFIA account.
2. Create a new service request
- On your dashboard, use the dropdown menu under "Party Administration" to choose your validated party
- Click "Select"
- Scroll down the page and select "New Service Request"
Figure 1: Create a new service request

Description of Figure 1: Create a new service request
Dashboard
Viewing: Emma's Food Exports PR-02148 - Party (Validated)
This section indicates that a user is currently logged into a validated account for a business entity called Emma's Food Exports, with a party ID number of PR-02148.
Party Administration section
This section provides a set of instructions for selecting or managing party profiles.
Choose your party (for example, Emma's Food Exports PR-02148 - Party (Validated)) in the dropdown list and then choose the select button to proceed. This section is highlighted by a red circle, with the number 1 to indicate that it's the first step in the process to create a new service request.
- To request a service for personal use, select your contact profile in the drop down list
- To request service for your business or organization, select the appropriate party profile in the drop down list
- To create a new profile or accept an invitation to create a new profile, click "Enrol New Party, Alternate Service Provider/Enter Invite Code"
Below the "Party Administration" section, there are also links to:
- manage party
- enrol a new party or an alternative service provider
- enter an invite code
Important Information section
This section is highlighted with a yellow background. If you have selected one or more licensable domestic activities, please provide additional information for establishments linked to your SFC licence(s).
Navigation section
This section allows users to navigate between the following tabs:
- Service Request (select this tab)
- Issued Permissions
- Issued Export Certificates
- Inspections Reports
- PASO Submission Outcomes
- e-Invoices
- Payments
Service Request tab
Welcome to your Service Request Dashboard. On this page, you can view your current or past service requests and create new service requests. The service you are requesting may be subject to a fee. To see a list of CFIA service fees and learn more, visit CFIA's Fees Notice.
Three buttons are presented to users to choose from:
- New Service Request (select this button to create a new service request)
- Amend a Permission
- Renew a Permission
The "New Service Request" button is highlighted by a red circle, with the number 2 to indicate that it's the second step in the process to create a new service request.
3. Select your application type
- Select "Export Application"
- Select "I Accept" to attest that your information is complete and accurate
- Select "Accept"
4. Provide an application name and date of export
Export certificates will not be issued for shipments that have already left Canada.
- Enter a unique application name (note: it should be a name that is easy to search)
- Enter the date of export (that is, the date that your product will be leaving Canada)
- If you do not have a confirmed date of export, identify the anticipated date
- Select "Next step"
To change your application's date of export to a later date, see Modify, print or replace. If you need to identify an earlier date of export, contact your local CFIA office.
5. Select a business line, commodity group, end use and destination country
- Use the dropdown menus to select the appropriate business line, commodity group, end use and destination country for your shipment
- Select "Next step" to continue
6. Identify transit countries
Identify any countries that your commodity will travel through after leaving Canada and before arriving at the importing country, if applicable.
- Select the desired countries
- Use the arrows to move your selections into the "Selected Transit Countries" box
- Select "Next step"
7. Select commodity sub-group, commodity type and product type
Identify all commodities in your shipment.
For more information on how different food products are categorized for the issuance of export certificates, see Commodity table: Categorized listing of food products for export.
- Use the buttons to select the "Commodity Sub-Group"
- Use the buttons to select the corresponding "Commodity Type" to see the associated product list
- Select "Product(s)" using the checkbox on the right
- Repeat with additional Commodity Sub-Groups and Commodities, if applicable
- Review your "Selection(s)"
- Select "Next step"
8. Identify the consignor
The consignor is the person or organization responsible for the sale and transportation of the goods or products.
- Select an operating name from the dropdown menu under "Available Operating Names"
- Add or edit an operating name by selecting "Manage Operating Names"
- Select the "Consignor Address" associated with the operating name (4 options are available)
- Establishment (use the "Select Establishment" dropdown menu to select a pre-existing address identified in your profile)
- Main office address
- Billing address
- Custom consignor
- Select "Next step"
Figure 2: Identify the consignor

Description of Figure 2: Identify the consignor
Identify the consignor
Please choose the operating name that will appear as the consignor's name on the export certificate (i.e. the exporter). You can select from the pre-existing operating names and addresses that you have identified in your profile or you can identify a custom consignor address using the radio button below. A custom selection will appear when you click the next step button.
Available operating names section
This section is labeled "Available Operating Names (Required)". Select a pre-existing operating name from your profile using the dropdown menu labeled, "Select Operating Name". The dropdown menu is highlighted by a red circle, with the number 1 to indicate that this selection is the first step in the process to identify the consignor.
Select the "Manage Operating Names" button to edit or update your list of operating names.
Consignor address section
Please select the consignor's address (required). This section is highlighted by a red circle, with the number 2 to indicate that this selection is the second step in the process to identify the consignor.
Please ensure that the address you choose is correctly associated with the operating name selected above. There are 4 options to choose from:
- Establishment
- Main Office Address
- Billing Address
- Add Custom Consignor
Next to the "Establishment" button, there is also a "Select Establishment" dropdown menu to select a specific establishment.
Navigation buttons
At the bottom of the application screen, there are 2 buttons labeled:
- "Next step" to proceed to the next screen
- "Back" to return to the previous screen
Select "Next step" to proceed. This section is highlighted by a red circle, with the number 3 to indicate that it's the third step in the process to identify the consignor.
9. Identify the consignee
The consignee (importing company) is the person or organization who is receiving the shipment at the destination country.
- Fill out all required fields (name, country, address lines and city)
- Select "Next step"
10. Add or remove rows in the export certificate product table
The export certificate product table is a list of products entered for export.
If more than 1 row is needed to certify the same products with distinguishing details (for example, country of origin), you can add more rows for that product.
- Select the "+" button under "Additional Rows" to add a row for the same product
- Select the "Country of Origin" for each product line
- Select "Next step"
Note: rows cannot be added or removed later.
11. Verify the eligibility of shipment for export
If your shipment is eligible for export, you can proceed to the next step.
- On the "Gathering Information for Your Export Certificate Application" page, select "Next step"
- On the "Eligibility Information and Certification Requirements" page, select "Confirm"
If your shipment is not eligible for export, you will receive an error message.
Figure 3: Verify the eligibility of shipment for export (Part 1)

Description of Figure 3: Verify the eligibility of shipment for export (Part 1)
Gathering information for your export certificate application
To proceed with your export certificate application, we will ask you a series of questions to verify the eligibility of your shipment for export and to begin building your export certificate.
If at any point during your session, you need to leave before you are finished, simply click on save and return to complete the application at a later time.
Once you have answered all the questions, the system will let you know if you need to submit any additional documentation. At the close of the session, you may also need to make arrangements for an inspection or with an Accredited Service Provider to carry out additional identified activities.
Navigation buttons
At the bottom of the application screen, there are 2 buttons labeled:
- "Next step" to proceed to the next screen
- "Back" to return to the previous screen
Select "Next step" to proceed. This button is highlighted by a red circle and the number 1 to indicate that it's the first step in the process to verify the eligibility of your export shipment.
Figure 4: Verify the eligibility of shipment for export (Part 2)

Description of Figure 4: Verify the eligibility of shipment for export (Part 2)
Eligibility information and certification requirements
Thank you for your export request. The information below outlines the export certificate(s) that will be generated based on the information that you have provided, along with any additional documents (if required).
If you need an inspection to fulfil the export requirements, you will be asked to identify establishment or facility information in the pages to follow.
If you require supporting documentation to fulfil the export requirements, you will be asked to upload the documentation, if available, in the pages to follow.
Export certificate(s) required section
Find the food export certificate(s) or other export documentation that's required for your application in this section.
In this example, a user looking to export meat and poultry products to the United States is shown:
- Certificate of Inspection Covering Meat and Poultry Products
- Additional certificate information will be required, in the pages to follow you will be able to view and add information to the certificate template
Helpful resources section
Review food commodity-specific resources in this section.
For example, here are the following helpful links for a user looking to export meat and poultry to the United States:
- Export requirements for meat
- Find CFIA Guidance
- Business Continuity Plan (BCP) – Meat to USA eCertification
- United States of America (US) – Export requirements for meat and poultry products
- Annex W: list of establishments eligible to export to the United States and species and processing category information
- Annex G: Guideline on meat and poultry meat product categorization
Applicable legislation section
This section includes 2 links to Canadian regulatory documents relevant to the export certification process:
Your status section
Review your application status in this section.
In this example, a user looking to export meat and poultry to the United States is shown the following hyperlinked messages:
- "The export application interview is complete"
- "The export application can be processed online"
There is also a small icon indicating that the export application, with the identified policy model, is eligible for online processing.
Navigation buttons
At the bottom of the application screen, there are 2 buttons labeled:
- "Confirm"
- "Back" to return to the previous screen
Select the "Confirm" button to proceed. This button is highlighted by a red circle with the number 2 to indicate that it's the second step in the process to verify the eligibility of your export shipment.
Additional verification
Depending on the food export certificate you are applying for, you may be required to provide additional information to verify the eligibility of your shipment. For example, applicants may be asked to select annexes required for export or attest to specific regulatory requirements.
12. Add a manufacturer
You will be required to add the manufacturer associated with your shipment to the export application. Depending on the commodity, multiple manufacturers may be selected.
- Select "Add Manufacturer"
- Search using a keyword of either the "Party" name or "Legal Name"
- Select the applicable "Party"
- Scroll down and "add" the applicable establishment
- Select "Save" at the bottom of the page
- Repeat if multiple manufacturers are associated with your shipment
- Select "Next step"
Figure 5: Add a manufacturer (Part 1)

Description of Figure 5: Add a manufacturer (Part 1)
Select manufacturer
Manufacturer selection
If the manufacturer is associated with your party, please choose the correct name, address, and appropriate licence combination for your application. Depending on the certificate you are applying for, one or more manufacturers may be selected. In most cases this information will be transferred to your export certificate. Click the Add button next to all the manufacturers as appropriate for your shipment.
Note: For the Certificate of Free Sale, only one manufacturer location may be selected per application. Only one manufacturer's name and address will be displayed on the certificate.
If the manufacturer you want to select is not associated with your party, you can search for the manufacturer using the filter field and click on one of the links in the table to select the correct party to display all the licensed establishments associated with that party in the following section. Click the Add button to select the correct name, address and appropriate licence combination for your application.
Please click on the Save button to return to the 55% Complete screen and progress through your application.
Table: Currently selected party
Review a table of manufacturers associated with the party, for example:
- Martellini Exportations (Legal name: Laiterie Martellini Inc.)
- ABC Imports & Exports (Legal name: ABC Imports & Exports)
- Anna's Pasta (Legal name: Anna's Pasta)
- ArialWakeSurf (Legal name: ArialWakeSurf)
- Baby Patch (Legal name: Baby Patch's Store)
- BakeryX (Legal name: Elisabeth)
- Beignet de luxe (Legal name: Beignet de luxe)
- CAC Training (Legal name: Big Mic)
- Charles (Legal name: CN-500)
- Chicken Nuggets Inc. (Legal name: CN inc.)
Select the correct party. You can use keywords in the search bar labeled, "Filter with keywords" to narrow down the list. This section is highlighted by a red circle, with the number 1 to indicate that this selection is the first step in the process to select a manufacturer.
In this example, a user selects "Chicken Nuggets Inc." and continues to the next step. The manufacturer "Chicken Nuggets Inc." is highlighted by a red circle, with the number 2 to indicate that this selection is the second step in the process to select a manufacturer.
Figure 6: Add a manufacturer (Part 2)
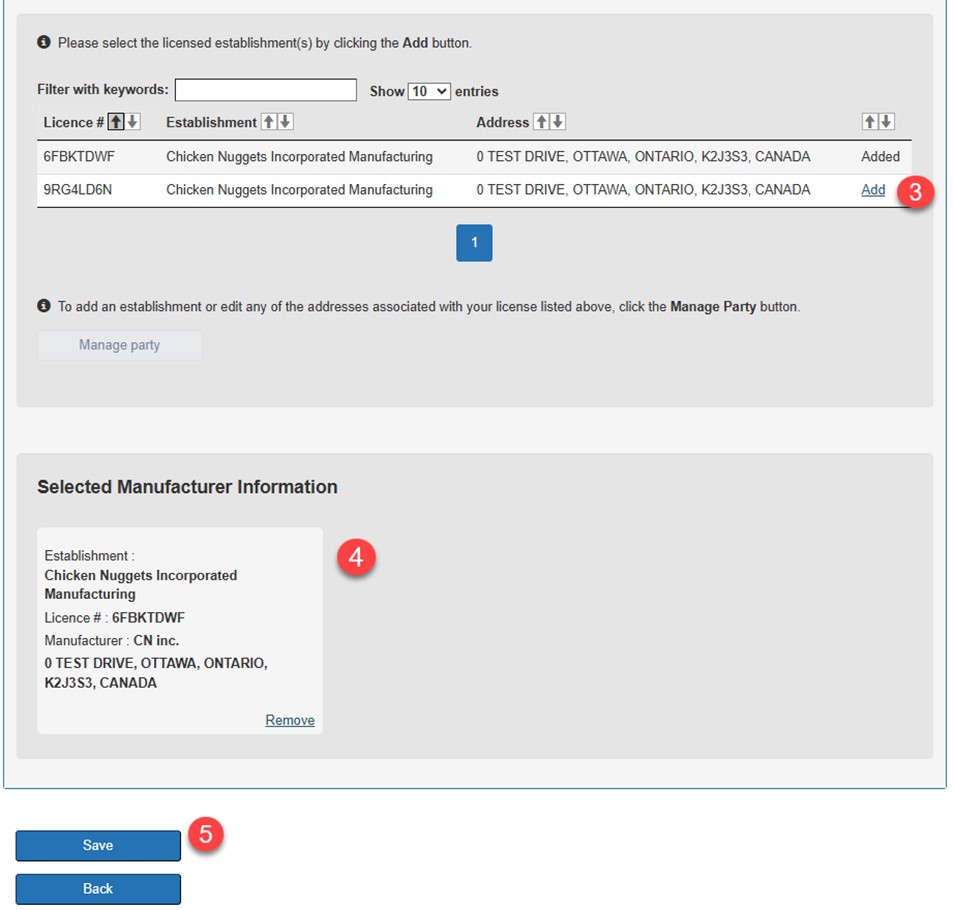
Description of Figure 6: Add a manufacturer (Part 2)
Table: Licensed establishment(s)
Please select the licensed establishment(s) by clicking the Add button. You can use the search bar labeled, "Filter with keywords" to narrow down the list of licensed establishments in the table below.
A table of licensed establishments belonging to the manufacturer, "Chicken Nuggets Inc." is shown as an example below. There are 2 data entries:
- Entry 1
- Licence #: 6FBKTDWF
- Establishment: Chicken Nuggets Incorporated Manufacturing
- Address: 0 Test Drive, Ottawa, Ontario, K2J3S3, Canada
- Selection: Added
- Entry 2
- Licence #: 9RG4LD6N
- Establishment: Chicken Nuggets Incorporated Manufacturing
- Address: 0 Test Drive, Ottawa, Ontario, K2J3S3, Canada
- Selection: Add
In this example, the user selected the "Add" button for Entry 1, so it is now "Added" as the licensed establishment. The "Add" button is highlighted by a red circle, with the number 3 to indicate that this selection is the third step in the process to select a manufacturer.
To add an establishment or edit any of the addresses associated with your license listed above, click the Manage Party button.
Selected manufacturer information section
Confirm that your selected manufacturer information is correct. This section is highlighted by a red circle, with the number 4 to indicate that it's the fourth step in the process to select a manufacturer. To remove a manufacturer, select "Remove" found in the bottom right corner of this section.
In this example, a user is shown the following information based on their selection in the table above:
Establishment: Chicken Nuggets Incorporated Manufacturing
Licence #: 6FBKTDWF
Manufacturer: CN inc.
Address: 0 Test Drive, Ottawa, Ontario, K2J3S3, Canada
Navigation buttons
At the bottom of this application screen, there are 2 buttons labeled:
- "Save"
- "Back" to return to the previous screen
Select the "Save" button to proceed. This button is highlighted by a red circle, with the number 5 to indicate it is the fifth step in the process to select a manufacturer.
How to remove a manufacturer
- Select the manufacturer that you would like to remove
- Select "Remove Selected Manufacturer"
- Select "Next step"
Figure 7: How to remove a manufacturer
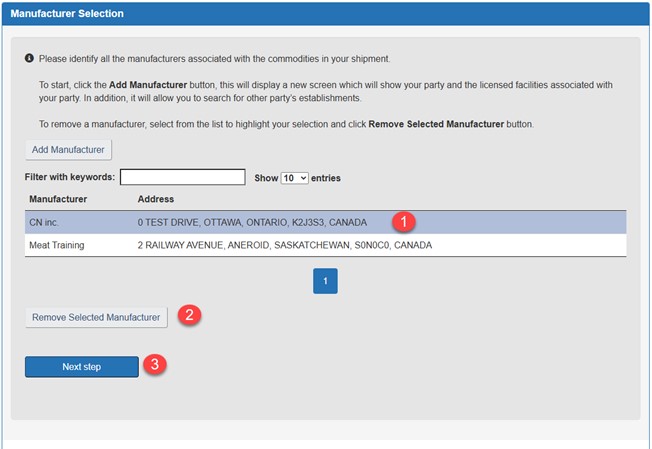
Description of Figure 7: How to remove a manufacturer
Table: Manufacturer selection
Please identify all the manufacturers associated with the commodities in your shipment.
To start, click the Add Manufacturer button, this will display a new screen which will show your party, and the licensed facilities associated with your party. In addition, it will allow you to search for other party's establishments.
To remove a manufacturer, select from the list to highlight your selection and click Remove Selected Manufacturer button.
Example: Removing a manufacturer
A table of manufacturers is shown as an example below. There is a search bar labeled, "Filter with keywords" to narrow down the list of manufacturers. There are 2 data entries:
- Entry 1
- Manufacturer: CN inc.
- Address: 0 Test Drive, Ottawa, Ontario, K2J3S3, Canada
- Entry 2
- Manufacturer: Meat Training
- Address: 2 Railway Avenue, Aneroid, Saskatchewan, S0N0C0, Canada
A user selects Entry 1 for deletion. This step is highlighted by a red circle, with the number 1 to indicate that this selection is the first step to remove a manufacturer.
The button labeled, "Remove selected manufacturer" is then selected by the user. This step is highlighted by a red circle, with the number 2 to indicate it is the second step to remove a manufacturer.
The user selects the navigation button labeled "Next step" to continue with the export application process. This step is highlighted by a red circle, with the number 3 to indicate it is the third step to remove a manufacturer.
13. Upload supporting documents (if applicable)
You may be required to upload documents for your application.
- Select "Upload Document"
- Select "Browse" and choose the document you want to upload
- Select "Upload"
- Name the uploaded document under "Document Name"
- Provide additional comments (optional)
- Select "Save"
- Select "Next step"
To skip this application step, select "Next step."
14. Add the location and date of inspection (if applicable)
You must:
- identify the first day available for inspection
- select the establishment where the product will be exported from
- select "Next step"
There are 3 methods to select your establishment:
- select the arrow buttons to "Add" or "Remove" an establishment (selected establishments will appear in the "Selected Establishments" list)
- select "Manage Party" to add an establishment to your party profile
- add a custom location (a facility that is not part of your party profile) by selecting "+Add a Location" and completing the required address information
Figure 8: Add the location and date of inspection

Description of Figure 8: Add the location and date of inspection
First available date for inspection section
Select the date icon to choose the date your export product is available for inspection (for example, 2025-03-19). This step is highlighted by a red circle, with the number 1 to indicate that this selection is the first step required to add the location and date of inspection.
Transfer list: Establishments and selected establishments
A two-column list is shown. The left column is titled "Establishments", and the right column is titled "Selected Establishments". In this example, a user is shown:
- Establishments column: Emma's manufacturing company
- Selected Establishments column: empty cell
Between the 2 columns are 2 directional arrow buttons. The right/forward arrow can be used to move a selected establishment from the "Establishments" column to the "Selected Establishments" column. The left/back arrow can be used to remove an establishment from the "Selected Establishments" column.
If applicable, please choose the establishment where the product to be exported will be available for inspection by the date indicated above. Use the "forward" arrows to move the identified establishment to the "selected establishments" box. There is a red circle, with the number 2 to indicate that this selection of establishment is the second step to add the location and date of inspection. If you make a mistake, use the "back arrow" to remove the establishment. Use the "Manage Party" button to add an establishment within your profile that does not appear here.
To edit any of the addresses or Establishments above, click the Manage Party button.
Table: Custom location
If your exporting product is available for inspection at a facility that is not an establishment on your party profile, use the "+ Add a Location" button to add a new location or choose one from the list below. The following columns are shown in the custom location table:
- Custom Location Name
- Custom Est Number
- City
- State/Province/Region
- Address Line 1
No data is currently available in the table.
Navigation buttons
At the bottom of the application screen, there are 2 buttons labeled:
- "Next step" to continue with the export application process
- "Back" to return to the previous screen
Select "Next step" to proceed. This step is highlighted by a red circle, with the number 3 to indicate it is the third step to add the location and date of inspection.
15. Modify transportation information
The "Conveyance Type" is a mandatory field. You can choose:
- air transport
- maritime transport
- rail transport
- road transport
Once complete, select "Next step."
There are no specific requirements for entering information in the "Conveyance Information" field. But you can choose to enter:
- flight reference numbers
- licence plates of vehicles
- other identifying conveyance information
16. Add additional export product information
Enter all relevant product information for the certificate. Mandatory fields will be identified with a red asterisk.
Note: use the sliding bar under "Detailed Lot Descriptions" to display additional fields.
Figure 9: Add additional export product information (Part 1)

Description of Figure 9: Add additional export product information (Part 1)
Additional export product information
This application page has multiple labeled sections and fields to collect specific details about products intended for export.
Note: This page is commodity specific depending on the food export certificate application.
Section 1: Certificate number information
This section begins with an info icon and a note that states, "Declare Export Product Descriptions". In the top right corner of the page, there's also a certificate number displayed:
- Certificate number (Draft): 2025-S-400517679
Section 2: Detailed lot descriptions table
A table is shown, with the following export product information as an example:
- #: 1
- Type: Raw Intact Meat
- Product: Goat
- Product Description (mandatory field): Blank cell
- Net Weight (mandatory field): Blank cell (Unit in pounds, abbreviated "lb")
- Species (mandatory field): Blank cell
- Processing Category: Blank cell
- Product Category: Blank cell
There's also a sliding bar that allows users to see additional table columns. It is highlighted by a red circle, with the number 1. See Figure 10 for more information.
Section 3: Shipment details
Below the detailed lot descriptions table, there are 2 labeled fields:
- Exporting Establishment Number (mandatory): Blank cell
- Additional Certification Information: Blank cell
Information relevant to the shipment details may be entered into these text fields.
Section 4: Foreign establishments
This section begins with an info icon and a note that states, "Foreign Producing Establishment(s) if Imported Product". Below is a table with the following column headers:
- Country of Origin
- Foreign Est. Name
- Foreign Est. #
- Foreign Est. Address
There is currently no data available in the table.
Use the "Add a Foreign Establishment" button to add foreign establishments associated with the export product, if applicable.
Navigation buttons
At the bottom of the application screen, there is a button labeled "Next step" to continue with the export application process.
Figure 10: Add additional export product information (Part 2)

Description of Figure 10: Add additional export product information (Part 2)
Additional export product information
This application page has multiple labeled sections and fields to collect specific details about products intended for export.
Note: This page is commodity specific depending on the food export certificate application.
Section 1: Certificate number information
This section begins with an info icon and a note that states, "Declare Export Product Descriptions". In the top right corner of the page, there's also a certificate number displayed:
- Certificate number (Draft): 2025-S-400517679
Section 2: Detailed lot descriptions table (continued from Figure 9)
A table is shown, with the following export product information as an example:
- Product Group: Blank cell
- No. of Packages in Lot (mandatory field): Blank cell
- Type of Packages in Lot (mandatory field): Blank cell
- Shipping Marks (mandatory field): Blank cell
- Producing Establishment Number: Blank cell
There's also a sliding bar that allows users to see additional table columns. It is highlighted by a red circle, with the number 2. See Figure 9 for more information.
Section 3: Shipment details
Below the detailed lot descriptions table, there are 2 labeled fields:
- Exporting Establishment Number (mandatory): Blank cell
- Additional Certification Information: Blank cell
Information relevant to the shipment details may be entered into these text fields.
Section 4: Foreign establishments
This section begins with an info icon and a note that states, "Foreign Producing Establishment(s) if Imported Product". Below is a table with the following column headers:
- Country of Origin
- Foreign Est. Name
- Foreign Est. #
- Foreign Est. Address
There is currently no data available in the table.
Use the "Add a Foreign Establishment" button to add foreign establishments associated with the export product, if applicable.
Navigation buttons
At the bottom of the application screen, there is a button labeled "Next step" to continue with the export application process.
17. Enter attestation information details (if applicable)
Depending on the food export certificate, you may enter additional "Annex or Attestation" details.
Note: this step is only required for certain food export certificates.
18. Export certificate information and attestation
To view a "Draft" copy of your export certificate, select "View" in the row below "Certificate Name". Additional acknowledgement is required for your export certificate attestations.
- In the row below "Attestation", select "View"
- Review attestations associated with your export certificate
- At the bottom of the page, select "I acknowledge"
- Select "Acknowledge" to submit
- Select "Next Step"
19. Identify a CFIA service location (if applicable)
Search for a CFIA office (service location for your application) using the following filters:
- name
- address
- city
- province
- commodity group
After you select a service location, you can set that CFIA office as your default service location for all service requests.
Select "Next step".
20. Select the invoice recipient (if applicable)
If you are representing a party and submitting an export application on their behalf, you must select a recipient for the invoice.
There are 2 options for the invoice recipient:
- Represented Party
- Third Party Representative
21. Submit your application
Review your application. Once you have confirmed the accuracy and completeness of the information, click "Submit".
Return to your My CFIA homepage to see the status of your application.