
Honey Bee Producer Guide to the National Bee Farm-level Biosecurity Standard
Appendix C: Honey bee operating steps
This page is part of the Guidance Document Repository (GDR).
Looking for related documents?
Search for related documents in the Guidance Document Repository

Figure 1 illustrates the steps of spring management. Outdoor winter colonies are unwrapped when appropriate and assessed for pests, strength and feed stores. Either requeen, or unite colonies that are weak and not diseased, feed if required or refer to pest management strategies if required. If treated, evaluate treatment efficacy then either requeen, or unite colonies that are weak and not diseased or split colonies. For colonies in spring yards, ship to fields for honey production or custom pollination.
Description for flowchart - Figure 1: Spring management
Figure 1 is a flow process diagram that illustrates the steps of spring management with boxes connected by arrows in a series of conditional steps.
- The first box is labelled Unwrap outdoor winter colonies when appropriate. An arrow leads to a box labelled:
- Assess colonies for pests, strength, and feed stores
- From Assess colonies for pests, strengths and feed stores arrows lead to boxes labelled:
- Requeen, or unite colonies that are weak and not diseased
- Feed if required
- Refer to pest management strategies if required
- From Requeen, or unite colonies that are weak and not diseased and arrow leads to a box labelled:
- Evaluate treatment efficacy
- From Feed if required an arrow leads to a box labelled:
- Evaluate treatment efficacy
- From Refer to pest management strategies if required an arrow leads to a box labelled:
- Evaluate treatment efficacy
- From Evaluate treatment efficacy two arrows lead to boxes labelled:
- Requeen, or unite colonies that are weak and not diseased
- Colony splitting may occur
- From Colony splitting may occur an arrow leads to a box labelled:
- For colonies in spring yards, ship to fields for honey production or custom pollination

Figure 2 follows the operational steps for summer management for honey production. Swarming is reduced by ensuring adequate space is provided. Honey supers are added to the colonies. Best practice includes using a queen excluder. Colonies are assessed for pests and strength over the summer. Requeen, unite, or equalize weak colonies then remove/replace honey supers. Honey harvesting includes: tipping off, blowing bees, fume boards, brushing bees and escape boards. In late summer entrances can be reduced and colonies may be transported to new locations (fields or a fall yard). Some bees remain in the field for fall management.
Description for flowchart - Figure 2: Summer management for honey Production
Figure 2 is a flow process diagram that illustrates the steps of summer management for honey production with boxes connected by arrows in a series of conditional steps.
- The first box is labelled Reduce swarming by ensuring adequate space. An arrow leads to a box labelled:
- Add honey supers to colonies
- From Add honey supers to colonies two arrows lead to boxes labelled:
- Be aware that best practice includes using a queen excluder
- Assess colonies for pests and strength over the summer
- From Be aware that best practice includes using a queen excluder single arrows lead to boxes in the following order labelled:
- Assess colony strength
- Remove/replace honey supers
- Honey harvesting – tipping off, blowing bees, fume boards, brushing bees, escape boards
- From Honey harvesting – tipping off, lowing bees, fume boards, brushing bees, escape boards two arrows lead to two boxes labelled:
- In late summer, reduce entrances
- Colonies may be transported to new location (fields or fall yard)
- From In late summer, reduce entrances an arrow leads to a box labelled:
- Some bees remain in field for fall management
- From Assess colonies for pests and strength over the summer an arrow leads to a box labelled:
- Requeen, unite, or equalize weak colonies
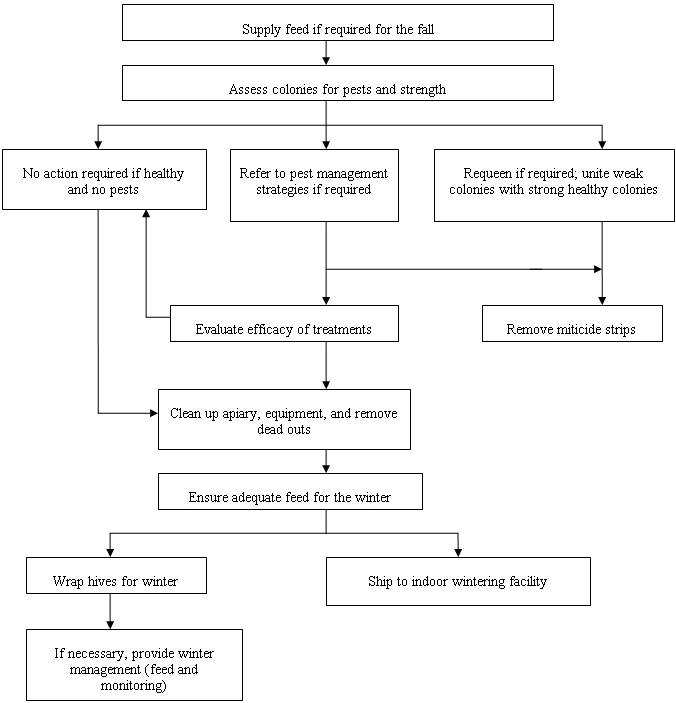
Figure 3 follows the operational steps for fall management. If required, feed is supplied for the fall. Colonies are assessed for pests and strength. If required, refer to pest management strategies. If no action is required clean up the apiary, equipment, and remove dead outs. Requeen if required; unite weak colonies with strong healthy colonies. Remove miticide strips if required and evaluate the efficacy of treatments. Ensure there is adequate feed for the winter. Either ship to an indoor wintering facility or wrap the hives for the winter. If necessary, provide winter management strategies including feeding and monitoring.
Description for flowchart - Figure 3: Fall management
Figure 3 is a flow process diagram that illustrates the steps of fall management for honey production with boxes connected by arrows in a series of conditional steps.
- The first box is labelled Supply feed if required for the fall. An arrow leads to a box labelled:
- Assess colonies for pests and strength
- From Assess colonies for pests and strength three arrows lead to three boxes labelled:
- No action required if healthy and no pests
- Refer to pest management strategies if required
- Requeen if required; unite weak colonies with strong healthy colonies
- From No action required if healthy and no pests an arrow leads to a box labelled:
- Clean up apiary, equipment, and remove dead outs
- From Refer to pest management strategies if required two arrows lead to two boxes labelled:
- Evaluate efficacy of treatments
- Remove miticide strips
- From Requeen if required; unite weak colonies with strong healthy colonies an arrow leads to a box labelled:
- Remove miticide strips
- From Evaluate efficacy of treatments two arrows lead to two boxes labelled:
- No action required if healthy and no pests
- Clean up apiary, equipment, and remove dead outs
- From Clean up apiary, equipment, and remove dead outs an arrow leads to a box labelled:
- Ensure adequate feed for the winter
- From Ensure adequate feed for the winter two arrows lead to two boxes labelled:
- Ship to indoor wintering facility
- Wrap hives for winter
- From Wrap hives for winter an arrow leads to a box labelled:
- If necessary, provide winter management (feed and monitoring)
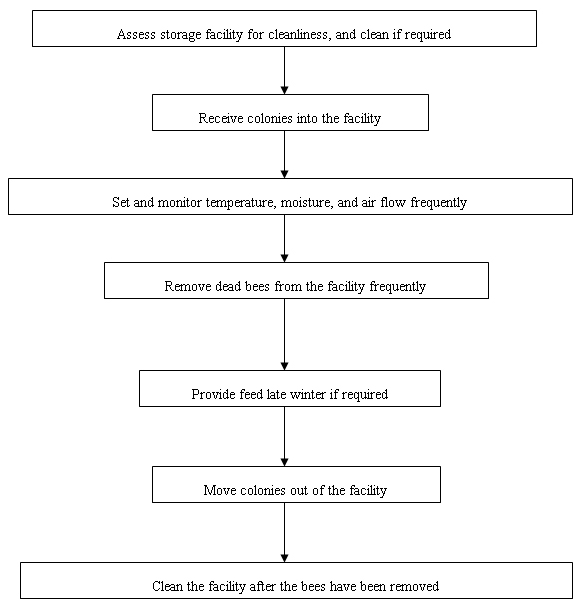
Figure 4 follows the operational steps for wintering indoors. Assess the storage facility for cleanliness, and clean if required. Receive the colonies into the facility. Set and monitor temperature, moisture, and air flow frequently. Remove dead bees from the facility frequently. If required, provide feed in the late winter. Move the colonies out of the facility and clean the facility after the bees have been removed.
Description for flowchart - Figure 4: Wintering indoors
Figure 4 is a linear flow process diagram that illustrates the steps of wintering indoors for honey production with boxes connected by arrows in a series of conditional steps.
- The first box is labelled Assess storage facility for cleanliness, and clean if required. Single arrows lead to and from each of the following boxes labelled:
- Receive colonies into the facility
- Set and monitor temperature, moisture, and air flow frequently
- Remove dead bees from the facility frequently
- Provide feed late winter if required
- Move colonies out of the facility
- Clean the facility after the bees have been removed

Figure 5 follows the operational steps for requeening. Locate and remove the existing queen and assess why the queen has failed. Treat or destroy colonies as required and ensure the queen being introduced is healthy. Introduce a new caged queen to the queenless colony and release the queen after a couple of days. Reassess for queen acceptance. Repeat if necessary.
Description for flowchart - Figure 5: Requeening
Figure 5 is a linear flow process diagram that illustrates the steps of requeening for honey production with boxes connected by arrows in a series of conditional steps.
- The first box is labelled Locate and remove the existing queen. Single arrows lead to and from each of the following boxes labelled:
- Assess why the queen has failed
- Treat or destroy colonies as required
- Ensure the health status of the queen being introduced
- Introduce a new caged queen to the queenless colony
- Release the queen from the cage after a couple of days
- Reassess for queen acceptance
- From Reassess for queen acceptance and arrow leads back to the first box labelled Locate and remove the existing queen
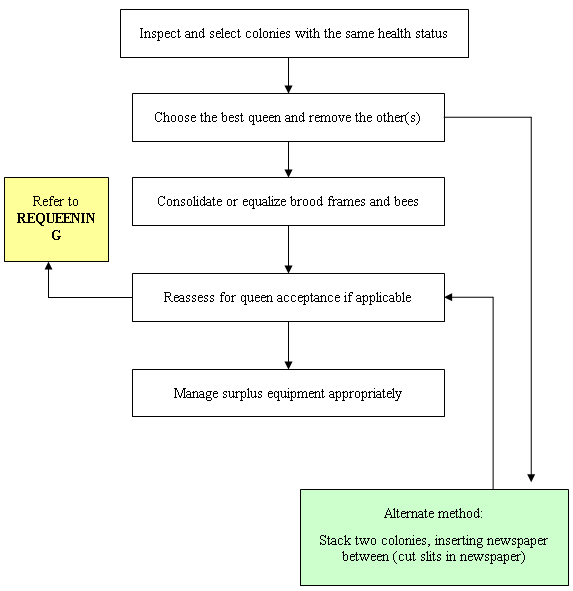
Figure 6 follows the operational steps for uniting or equalizing a colony. Inspect and select colonies with the same health status. Choose the best queen and remove the other(s). An alternate method involves stacking 2 colonies, and inserting newspaper with slits cut in the newspaper between them. Consolidate or equalize brood frames and bees and if applicable reassess for queen acceptance. Manage surplus equipment appropriately. If required, refer to the requeening process.
Description for flowchart - Figure 6: Uniting or equalizing a colony
Figure 6 is a flow process diagram that illustrates the steps of uniting or equalizing a colony for honey production with boxes connected by arrows in a series of conditional steps.
- The first box is labelled Inspect and select colonies with the same health status. An arrow leads to a box labelled:
- Choose the best queen and remove the other(s)
- From Choose the best queen and remove the other(s) two arrows lead to two boxes labelled:
- Consolidate or equalize brood frames and bees
- Alternate method: Stack two colonies, inserting newspaper between (cut slits in newspaper)
- From Consolidate or equalize brood frames and bees an arrow leads to a box labelled:
- Reassess for queen acceptance if applicable
- From Reassess for queen acceptance if applicable three arrows lead to three boxes labelled:
- Refer to REQUEENING Chart
- Alternate method: Stack two colonies, inserting newspaper between (cut slits in newspaper)
- Manage surplus equipment appropriately
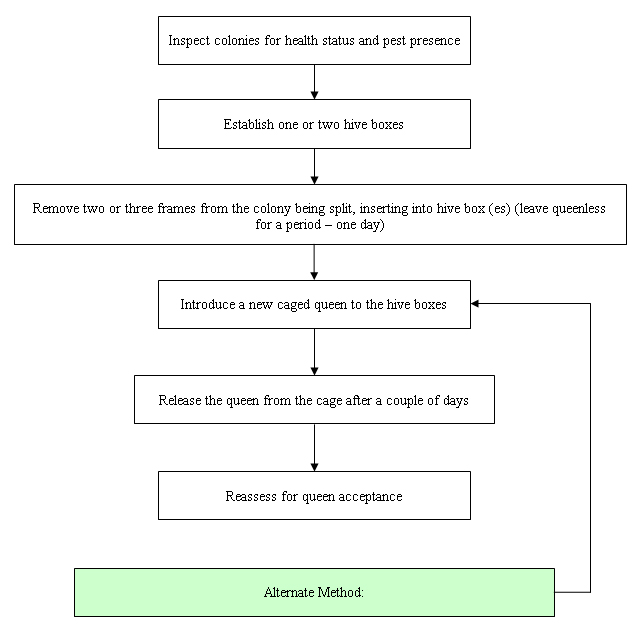
Figure 7 follows the operational process of splitting a colony. Inspect colonies for health status and the presence of pests. Establish 1 or 2 hive boxes. Remove 2 or 3 frames from the colony being split and insert them into the new hive box (es) – leave this box queenless for 1 day. Introduce a new caged queen to the hive box (es) and release the queen from the cage after a couple of days. Reassess for queen acceptance. An alternate method involves taking a 2 box colony and splitting by using the top box – leave queenless for 1 day.
Description for flowchart - Figure 7: Splitting a colony
Figure 7 is a linear flow process diagram that illustrates the steps for splitting a colony for honey production with boxes connected by arrows in a series of conditional steps.
- The first box is labelled Inspect colonies for health status and pest presence. Single arrows lead to and from each of the following boxes labelled:
- Establish one or two hive boxes
- Remove two or three frames from the colony being split, inserting into the hive box (es) (leave queenless for a period – one day)
- Introduce a new caged queen to the hive boxes
- Release the queen from the cage after a couple of days
- Reassess for queen acceptance
- The final box is labelled Alternate method: Take two-box colony, use top for split; leave queenless for one day. An arrow leads to the box labelled:
- Introduce a new caged queen to the hive boxes
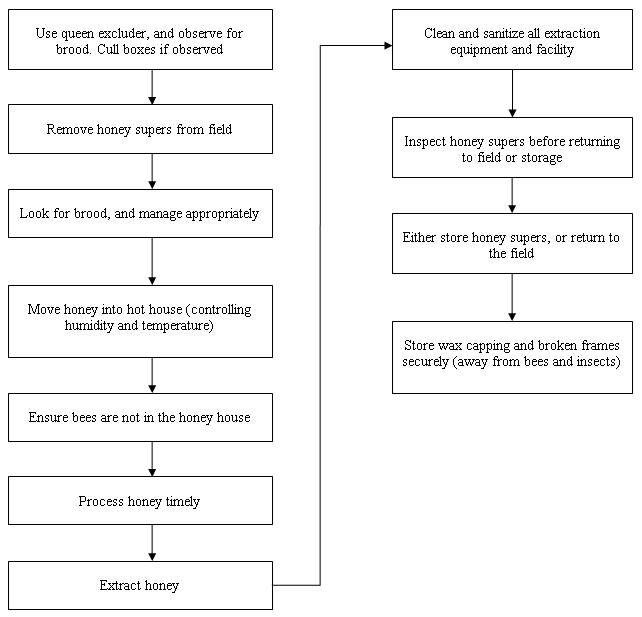
Figure 8 follows the operational process for honey extraction. Use a queen excluder and observe for brood. Cull the boxes if brood are present. Remove the honey supers from the field. Examine for brood and manage appropriately. Move the honey into a hot house with controlled humidity and temperature. Ensure no bees are in the honey house. Process the honey timely and extract. Clean and sanitize all extraction equipment and the facility. Inspect the honey supers before returning them to the field or storage facility. Either store the honey supers, or return them to the field. Store wax capping and broken frames away from bees and insects.
Description for flowchart - Figure 8: Honey extraction
Figure 8 is a linear flow process diagram that illustrates the steps for honey extraction for honey production with boxes connected by arrows in a series of conditional steps.
- The first box is labelled: Use queen excluder, and observe for brood. Cull boxes if observed. Single arrows lead to and from each of the following boxes labelled:
- Remove honey supers from field
- Look for brood, and manage appropriately
- Move honey into hot house (controlling humidity and temperature)
- Ensure bees are not in the honey house
- Process honey timely
- Extract honey
- Clean and sanitize all extraction equipment and facility
- Inspect honey supers before returning to field or storage
- Either store honey supers, or return to the field
- Store wax capping and broken frames securely (away from bees and insects)
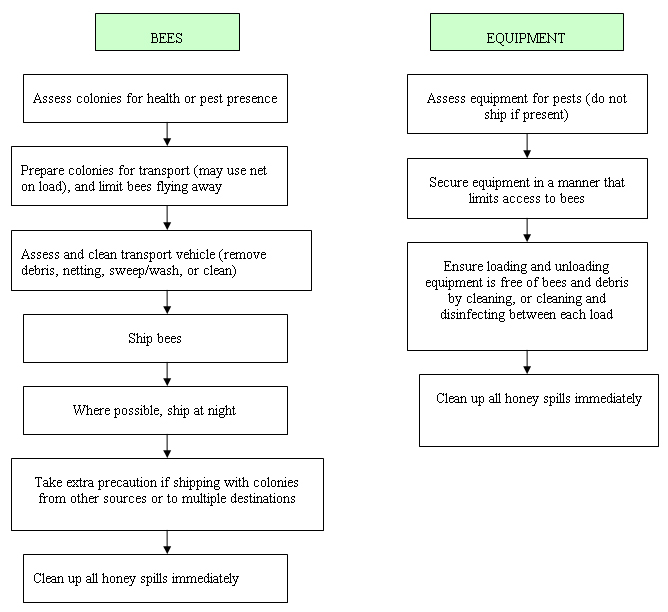
Figure 9 follows the operational process for transporting bees and equipment (forked). When transporting bees assess the colonies for health or the presence of pests. Prepare the colonies for transport in a manner that limits the bees flying away (using nets over the load). Assess and clean the transport vehicle by removing debris, netting, sweeping and washing or cleaning. Ship the bees preferably at night. Take extra precaution if shipping with colonies from other sources or when shipping to multiple destinations. Clean up all honey spills immediately. When transporting equipment assess the equipment for pests and do not ship if pests are present. Secure the equipment in a manner that limits access to bees. Ensure loading and unloading equipment is free of bees and debris by cleaning, or cleaning and disinfecting between each load. Clean up all honey spills immediately.
Description for flowchart - Figure 9: Transporting bees and equipment
Figure 9 has two linear flow process diagrams (two columns) that illustrate the steps for transporting bees and equipment (forked) for honey production with boxes connected by arrows in a series of conditional steps.
- Column 1: The first box is labelled: Bees. Single arrows lead to and from each of the following boxes labelled:
- Assess colonies for health or pest presence
- Prepare colonies for transport (may use net on load), and limit bees flying away
- Assess and clean transport vehicle (remove debris, netting, sweep/wash, or clean)
- Ship bees
- Where possible, ship at night
- Take extra precaution if shipping with colonies from other sources or to multiple destinations
- Clean up all honey spills immediately
- Column 2: The first box is labelled: Equipment. Single arrows lead to and from each of the following boxes labelled:
- Assess equipment for pests (do not ship if present)
- Secure equipment in a manner that limits access to bees
- Ensure loading and unloading equipment is free of bees and debris by cleaning, or cleaning and disinfecting between each load
- Clean up all honey spills immediately
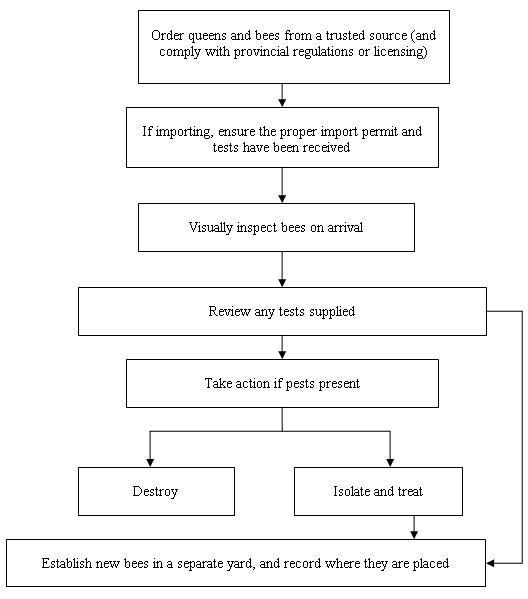
Figure 10 follows the operational process for receiving bees. Order queens and bees from a trusted source and comply with provincial regulations or licensing. If importing, ensure the proper import permit and tests have been received. Review any tests supplied. Destroy or isolate and treat if pests are present. Establish new bees in a separate yard, and record where they are placed.
Description for flowchart - Figure 10: Receiving bees
Figure 10 is a flow process diagram that illustrates the steps of receiving bees for honey production with boxes connected by arrows in a series of conditional steps.
- The first box is labelled: Order queens and bees from a trusted source (and comply with provincial regulations or licensing). An arrow leads to a box labelled:
- If importing, ensure the proper import permit and tests have been received
- From If importing, ensure the proper import permit and tests have been received, an arrow leads to a box labelled:
- Visually inspect bees on arrival
- From Visually inspect bees on arrival, an arrow leads to a box labelled:
- Review any tests supplied
- From Review any tests supplied, two arrows lead to two boxes labelled:
- Take action if pests present
- Establish new bees in a separate yard, and record where they are placed
- From Take action if pests present, two arrows lead to two boxes labelled:
- Destroy
- Isolate and treat
- From Isolate and treat, an arrow leads to a box labelled:
- Establish new bees in a separate yard, and record where they are placed

Figure 11 follows the operational process for receiving feed. Order syrup and pollen from a trusted source. Where appropriate, review any tests supplied with the feed. Test the feed if required (honey, pollen). Take action if supplies and/or material in infected or infested with pests. This can be done by destroying, treating or returning the material to the supplier.
Description for flowchart - Figure 11: Receiving feed
Figure 11 is a linear flow process diagram that illustrates the steps for receiving feed for honey production with boxes connected by arrows in a series of conditional steps.
-
The first box is labelled: Order syrup and pollen from a trusted source. Single arrows lead to and from each of the following boxes labelled:
- Review tests supplied with feed where appropriate
- Test feed if required (honey, pollen)
- Take action if supplies and/or material is infected or infested with pests
- Take action if pests present
-
From Take action if pests present, three arrows lead to three boxes labelled:
- Destroy
- Treat
- Return to supplier
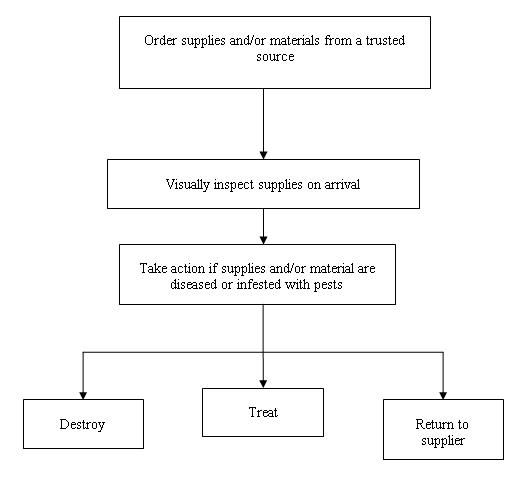
Figure 12 follows the operational process for receiving supplies. Order supplies and/or materials from a trusted source. Visually inspect supplies on arrival. Take action if supplies and/or materials are diseased or infested with pests by destroying, treating or returning to the supplier.
Description for flowchart - Figure 12: Receiving supplies
Figure 12 is a linear flow process diagram that illustrates the steps for receiving supplies for honey production with boxes connected by arrows in a series of conditional steps.
- The first box is labelled: Order supplies and/or materials from a trusted source. An arrow leads to a box labelled:
- Visually inspect supplies on arrival
- From Visually inspect supplies on arrival an arrow leads to a box labelled:
- Take action if supplies and/or material are diseased or infested with pests
- From Take action if supplies and/or material are diseased or infested with pests, three arrows lead to three boxes labelled:
- Destroy
- Treat
- Return to Supplier
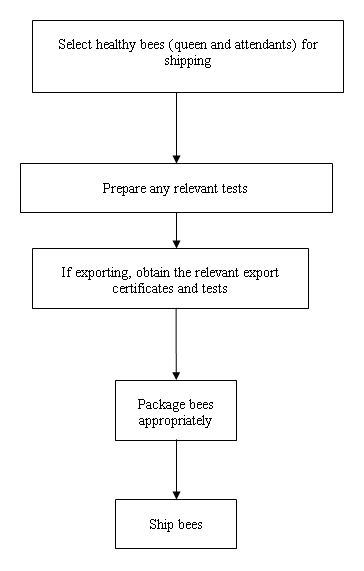
Figure 13 follows the operational process for shipping bees. Select healthy bees for shipping (queens and attendants). Prepare any relevant tests. If exporting, obtain the relevant export certificates and tests. Package the bees appropriately and ship.
Description for flowchart - Figure 13: Shipping bees
Figure 13 is a linear flow process diagram that illustrates the steps for shipping bees for honey production with boxes connected by arrows in a series of conditional steps.
- The first box is labelled: Select healthy bees (queen and attendants) for shipping. Arrows lead to and from each of the boxes labelled:
- Prepare any relevant tests
- If exporting, obtain the relevant export certificates and tests
- Package bees appropriately
- Ship bees
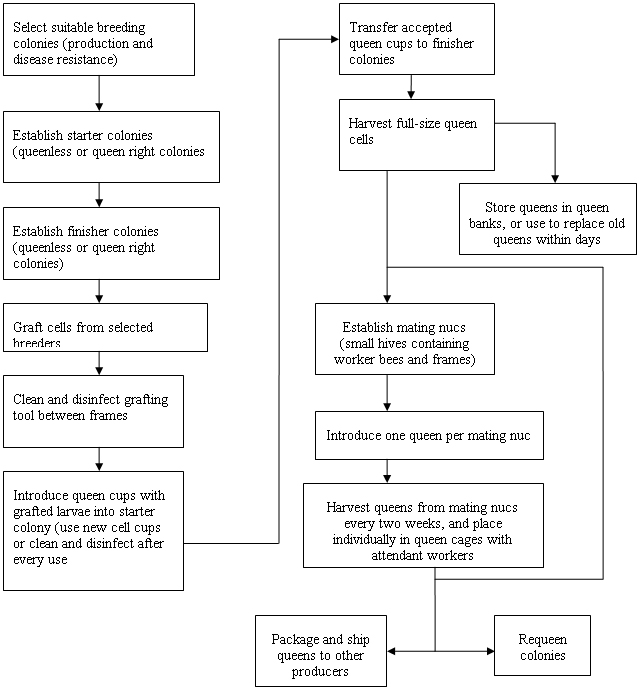
Figure 14 follows the operational process for queen rearing. Select suitable breeding colonies that exhibit good production and disease resistance. Establish starter colonies (queenless or queen right colonies). Graft cells from selected breeders colonies. Clean and disinfect grafting tool between frames. Introduce queen cups with grafted larvae into the starter colony. Use new cell cups or clean and disinfect after every use. Transfer the accepted queen cups to the finisher colonies. Harvest full-size queen cells. Either store queens in queen banks, or use them to replace old queens within days or establish mating nucs (small hives containing worker bees and frames). Introduce one queen per mating nuc . Harvest queens from mating nucs every 2 weeks, and place them individually in queen cages with attendant workers. Either package and ship the queens to other producers or requeen colonies.
Description for flowchart - Figure 14: Queen rearing
Figure 14 is a linear flow process diagram that illustrates the steps for queen rearing for honey production with boxes connected by arrows in a series of conditional steps.
- The first box is labelled: Select suitable breeding colonies (production and disease resistance). Arrows lead to and from initial boxes labelled:
- Establish starter colonies (queenless or queen right colonies)
- Establish finisher colonies (queenless or queen right colonies)
- Graft cells from selected breeders
- Clean and disinfect grafting tools between frames
- Introduce queen cups with grafted larvae into starter colony (use new cell cups or clean and disinfect after every use)
- Transfer accepted queen cups to finisher colonies
- Harvest full-size queen cells
- From Harvest full-size queen cells two arrows lead to two boxes labelled:
- Store queens in queen banks, or use to replace old queens within days
- Establish mating nucs (small hives containing worker bees and frames)
- From Establish mating nucs (small hives containing worker bees and frames) an arrow leads to a box labelled:
- Introduce one queen per mating nuc
- From Introduce one queen per mating nuc , an arrow leads to a box labelled:
- Harvest queens from mating nucs every two weeks, and place individually in queen cages with attendant workers
- From Harvest queens from mating nucs every two weeks, and place individually in queen cages with attendant workers, two arrows lead to two boxes labelled:
- Package and ship queens to other producers
- Requeen colonies
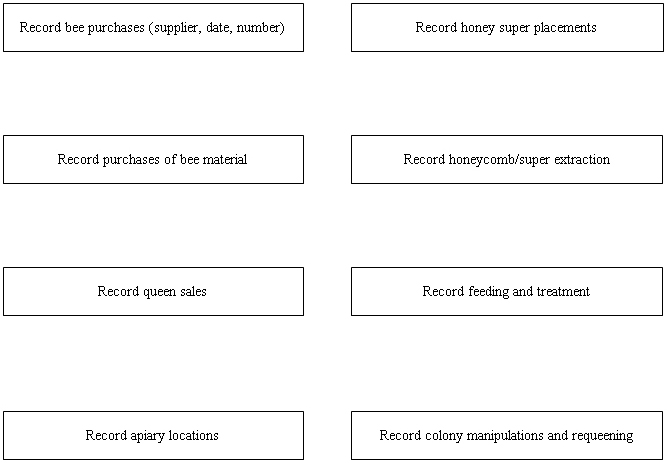
Figure 15 lists items that should be included when recording information about your operation. These include: bee purchases (supplier, date, and number), purchase of bee material, queen sales, apiary locations, honey super placements, honeycomb/super extraction, feeding, treatments, colony manipulations and requeening.
Description for flowchart - Figure 15: Recording
Figure 15 is a linear flow process diagram that lists information that would ideally be recorded for honey production.
- There are eight boxes with no connecting arrows. There are labelled:
- Record bee purchases (supplier, date, number)
- Record purchases of bee material
- Record queen sales
- Record apiary locations
- Record honey super placements
- Record honeycomb/super extraction
- Record feeding and treatment
- Record colony manipulations and requeening
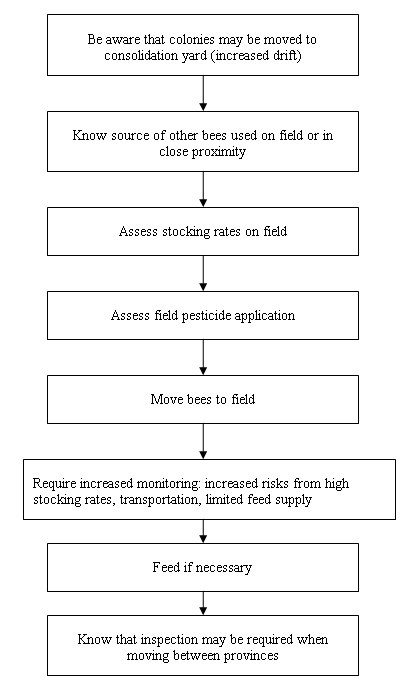
Figure 16 follows the operational steps for custom or contract pollination. Be aware that colonies may be moved to consolidation yards (increased drift). Know the source of other bees used on the field or in close proximity to your field. Assess stocking rates and pesticide applications on your field. Move the bees to the field. Increase monitoring of bees in the field due to increased risks from high stocking rates, transportation and limited feed supplies. Feed if necessary. Inspection may be required when moving between provinces.
Description for flowchart - Figure 16: Custom or contract pollination
Figure 16 is a linear flow process diagram that illustrates the steps for custom or contract pollination for honey production with boxes connected by arrows in a series of conditional steps.
- The first box is labelled: Be aware that colonies may be moved to consolidation yard (increased drift). Single arrows lead to and from boxes labelled:
- Know source of the other bees used on field or in close proximity
- Assess stocking rates on field
- Assess field pesticide application
- Move bees to field
- Require increased monitoring: increased risk from high stocking rates, transportation, limited feed supply
- Feed if necessary
- Know that inspection may be required when moving between provinces

Figure 17 lists important considerations for bee operation facilities. It is important to establish: bee-tight facilities, a facility maintenance schedule, a facility cleaning schedule and cold storage for equipment and supplies. Keep bees separate from storage areas that are used for honey processing and equipment storage. Clean up all honey spills immediately.
Description for flowchart - Figure 17: Facilities
Figure 17 is a linear flow process diagram that lists information about facility maintenance for honey production.
- There are six boxes with no connecting arrows. The boxes are labelled:
- Establish bee-tight facilities
- Separate bees from storage areas that are used for honey processing and equipment storage
- Establish a facilities' maintenance schedule
- Establish a facilities' cleaning schedule
- Establish some cold storage for equipment and supplies
- Clean up all honey spills immediately
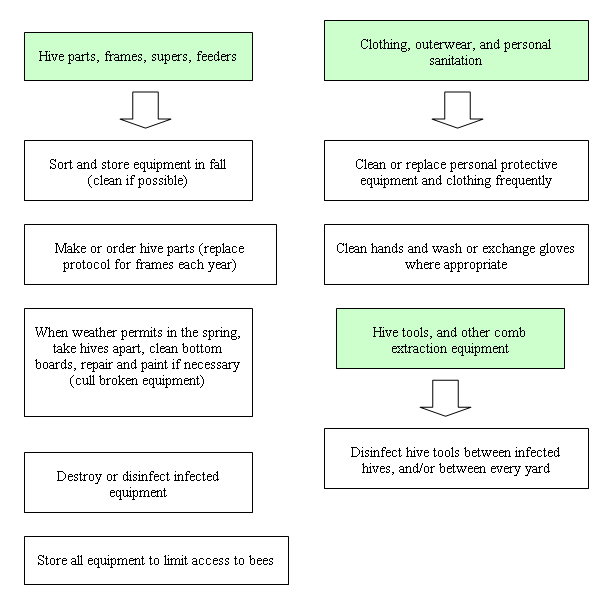
Figure 18 mentions the operational processes for equipment cleaning, personal sanitation, and storage. For hive parts, frames, supers, and feeders – sort, clean, and store equipment in the fall. Make or order hive parts and have a replacement protocol for frames each year. In the spring, when weather permits, take the hives apart, clean bottom boards, repair and paint if necessary. Cull broken equipment. Destroy or disinfect infected equipment. Store all equipment to limit access to bees. For personal sanitation, clothing and outerwear – clean or replace personal protective equipment and clothing frequently. Clean hands and wash or exchange gloves where appropriate. For Hive tools, and other comb extraction equipment – disinfect hive tools between infected hives, and/or between every yard.
Description for flowchart - Figure 18: Equipment cleaning, personal sanitation, and storage
Figure 18 is a linear flow process diagram with three columns that lists information about equipment cleaning, personal sanitation, and storage for honey production.
- Column 1: The first box is labelled: Hive parts, frames, supers, feeders. There are no arrows connecting the boxes that are labelled:
- Sort and store equipment in fall (clean if possible)
- Make or order hive parts (replace protocol for frames each year)
- When weather permits in the spring, take hives apart, clean bottom boards, repair and paint if necessary (cull broken equipment)
- Destroy or disinfect infected equipment
- Store all equipment to limit access to bees
- Column 2: The first box is labelled: Clothing, outerwear, and personal sanitation. There are no arrows connecting the boxes that are labelled:
- Clean or replace personal protective equipment and clothing frequently
- Clean hands and wash or exchange gloves where appropriate
- Column 3: The first box is labelled: Hive tools, and other comb extraction equipment. An arrow leads to a box labelled:
- Disinfect hive tools between infected hives, and/or between every yard
- Date modified: